
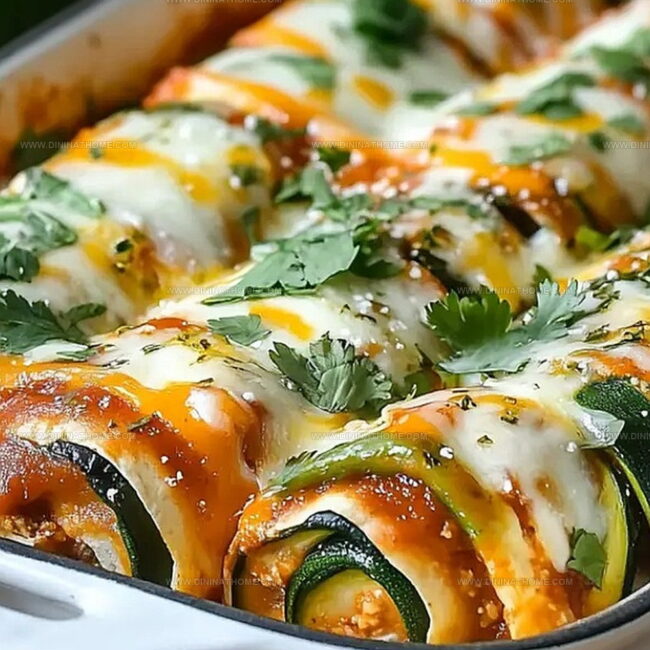
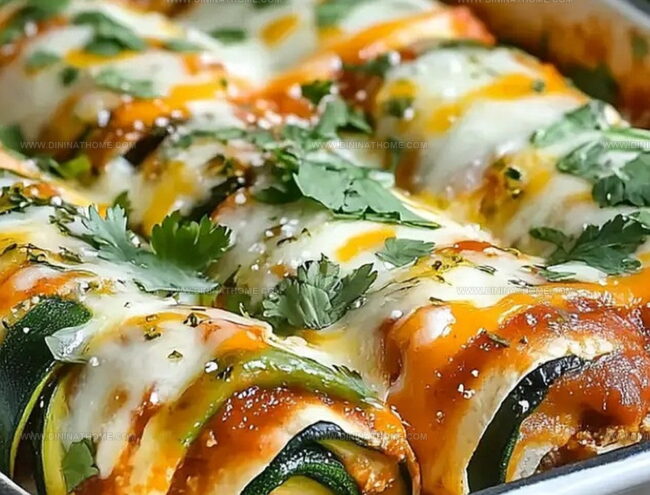
Zesty Zucchini Enchilada Roll-Ups Recipe: A Fresh Twist
My weekend experiments with zucchini enchilada roll-ups have transformed traditional Mexican comfort food into a lighter, more vibrant dish.
Slicing thin zucchini strips creates a delightful alternative to tortillas that brings fresh excitement to the table.
Unexpected textures and flavors dance together in this playful recipe that celebrates summer vegetables.
Cheese melts into every delicate crevice, creating pockets of creamy goodness that surprise and delight.
Lean proteins and colorful vegetables make these roll-ups a nutritious option for anyone seeking delicious, wholesome meals.
Rich spices infuse each bite with a warmth that connects you to classic enchilada traditions.
Zucchini Roll-Ups That Are Light, Tasty, And Packed With Sauce
Zucchini Enchilada Roll-Ups Ingredient Breakdown
Main Protein:Vegetable Components:Flavor and Binding Ingredients:Optional Garnish:Zucchini Enchilada Roll-Up Steps That Simplify Dinner
Step 1: Warm Up the Oven
Crank the oven to a toasty 375°F (190°C) and get ready for some delicious magic.
Step 2: Create the Filling Fusion
In a spacious mixing bowl, combine:Stir everything together until perfectly blended.
Step 3: Slice Zucchini with Precision
Grab a mandoline or sharp knife and transform zucchini into delicate strips.
Aim for paper-thin slices about ⅛-inch thick to make rolling a breeze.
Step 4: Prepare the Baking Vessel
Spread a generous layer of enchilada sauce across the bottom of a large baking dish.
Step 5: Build the Zucchini Canvas
Arrange 2–3 zucchini strips on a flat surface, slightly overlapping to create a flexible sheet about 3–4 inches wide.
Step 6: Roll with Flavor
Scoop 2–3 tablespoons of the chicken mixture onto the zucchini strip.
Roll tightly, transforming it into a delectable little bundle.
Step 7: Fill the Baking Dish
Position the roll-ups seam-side down in the saucy baking dish.
Keep rolling until you’ve used all the filling and zucchini – you’ll end up with around 24 irresistible rolls.
Step 8: Sauce It Up
Drizzle the remaining enchilada sauce over the roll-ups, ensuring each one gets a flavorful coating.
Step 9: Cheese Shower
Sprinkle a generous layer of shredded cheese across the top of the roll-ups.
Step 10: Bake to Perfection
Slide the dish into the preheated oven and bake for 20–25 minutes.
Look for bubbly, melted cheese as your signal of deliciousness.
Step 11: Cool Down Moment
Remove from the oven and let the roll-ups rest for a few minutes.
Step 12: Final Touch
Scatter some fresh chopped cilantro on top for a pop of color and extra flavor.
Step 13: Serve and Savor
Plate up these zucchini enchilada roll-ups while they’re warm and get ready to wow your taste buds!
Zucchini Roll-Up Tips with Enchilada Goodness
Use a mandoline or sharp knife to create uniform, thin strips around ⅛-inch thick for easy rolling and consistent cooking.
Pat zucchini strips dry with paper towels to remove excess moisture and ensure a firm, crispy texture in your roll-ups.
Swap chicken with ground turkey, shredded beef, or plant-based protein for a versatile and personalized meal that suits different dietary preferences.
Prepare roll-ups in advance, cover tightly, and freeze for up to 2 months – perfect for quick, convenient meals during busy weeks.
Adjust enchilada sauce heat by choosing mild, medium, or hot varieties to match your family’s taste preferences and spice tolerance.
Reheat Zucchini Enchilada Roll-Ups
Side Dishes for Zucchini Enchilada Roll-Ups
Zucchini Enchiladas with Alternate Fillings
FAQs
Yes, these roll-ups replace traditional tortillas with zucchini strips, making them a low-carb and gluten-free alternative to classic enchiladas.
Absolutely! Simply substitute the chicken with additional beans, tofu, or roasted vegetables to create a delicious vegetarian version.
Lightly salt the zucchini strips and let them sit for 10 minutes before patting dry with paper towels. This helps remove excess moisture and ensures a firmer texture.
Use a sharp kitchen knife and slice the zucchini as evenly as possible. Take your time to create thin, consistent strips that will roll easily.
Print
Zucchini Enchilada Roll-Ups Recipe
- Total Time: 40 minutes
- Yield: 6 1x
Description
Scrumptious zucchini enchilada roll-ups bring Mexican-inspired flavors to your dinner table with a nutritious twist. Rolled zucchini slices packed with savory cheese and spices deliver a delightful meal you’ll crave again and again.
Ingredients
Main Ingredients:
- 2 lbs zucchini (24 medium-large), sliced thinly lengthwise
- 2 cups cooked chicken, shredded or diced
- 1 cup black beans, drained and rinsed
- 1 cup corn (fresh or frozen)
Cheese and Sauce:
- 1 cup cheddar cheese, shredded (or a mix of cheddar and Monterey Jack)
- 2 cups enchilada sauce, divided
Garnish:
- 2 tablespoons cilantro, chopped (optional)
Instructions
- Prepare the oven for roasting by setting the temperature to 375°F (190°C), ensuring an ideal cooking environment for the zucchini enchilada roll-ups.
- Create a robust filling by thoroughly combining shredded chicken, black beans, corn, and a generous portion of enchilada sauce in a spacious mixing bowl.
- Transform zucchini into delicate ribbons using a mandoline or precision knife, crafting thin longitudinal strips approximately ⅛-inch thick for effortless rolling.
- Establish a flavorful foundation by spreading enchilada sauce across the bottom of a large baking vessel.
- Construct zucchini sheets by layering 2–3 strips slightly overlapping to form a flexible 3–4-inch wide surface.
- Distribute the chicken mixture strategically onto the zucchini sheets, then meticulously roll into compact cylinders, ensuring a tight and secure formation.
- Position the rolled enchiladas with the seam facing downward in the prepared baking dish, continuing the process until all ingredients are utilized, yielding approximately 24 delectable rolls.
- Lavish the remaining enchilada sauce over the assembled roll-ups, creating a moisture-rich coating.
- Generously blanket the rolls with shredded cheese, promising a golden, melted topping.
- Roast in the preheated oven for 20–25 minutes, watching for the cheese to transform into a bubbling, golden-brown landscape.
- Extract from the oven and allow a brief resting period to stabilize the dish’s structure.
- Optional: Embellish with freshly chopped cilantro for a vibrant, herbaceous accent.
- Serve while warm, inviting diners to savor this innovative culinary creation.
Notes
- Slice zucchini uniformly using a mandoline for consistent, thin strips that roll easily without breaking.
- Blot zucchini strips with paper towels to remove excess moisture, preventing soggy roll-ups during baking.
- Experiment with protein alternatives like black beans, tofu, or shredded jackfruit for vegetarian or vegan versions.
- Adjust seasoning by adding cumin, chili powder, or smoked paprika to enhance the flavor profile of the chicken mixture.
- Prep Time: 15 minutes
- Cook Time: 25 minutes
- Category: Lunch, Dinner, Appetizer
- Method: Baking
- Cuisine: Mexican
Nutrition
- Serving Size: 6
- Calories: 320
- Sugar: 4 g
- Sodium: 600 mg
- Fat: 12 g
- Saturated Fat: 6 g
- Unsaturated Fat: 4 g
- Trans Fat: 0 g
- Carbohydrates: 36 g
- Fiber: 8 g
- Protein: 22 g
- Cholesterol: 70 mg
James Walker
Lead Recipe Developer & Culinary Educator
Expertise
Southern Cuisine & Farm-to-Table Cooking, Recipe Development & Testing, Culinary Education & Instruction
Education
School: Auguste Escoffier School of Culinary Arts
Program: Diploma in Culinary Arts and Operations
Focus: Comprehensive training in classical and modern culinary techniques, kitchen operations, and farm-to-table practices.
James didn’t learn cooking from a TV show, he learned it from busy kitchens, family gatherings, and long afternoons spent testing recipes the hard way.
After training at the Auguste Escoffier School of Culinary Arts, he brought his love for real, down-to-earth food to every dish he makes.
At Dining At Home, James loves building recipes that feel familiar but still have something special, like adding a twist to a classic or making a slow Sunday dinner feel brand new.
When he’s not in the kitchen, you’ll probably find him swapping garden tips at the farmers’ market or teaching his daughter how to flip pancakes without a mess (almost).