
Fluffy Portuguese Easter Cake Recipe: A Festive Sweet Treat
Baking a traditional Portuguese Easter cake brings pure joy to my weekend culinary adventures.
sweet aromas will soon fill the kitchen with delightful memories.
Local bakeries inspired me to recreate this delectable treat at home.
My grandmother’s stories about festive celebrations always made me curious about authentic recipes.
Regional ingredients connect us to cultural traditions in meaningful ways.
Carefully crafted techniques transform simple components into something magical.
Let’s embark on this delicious journey together and create something extraordinary that honors Portuguese culinary heritage.
Portuguese Easter Cake That Feels Like a Spring Celebration
Effortlessly Master a Traditional Treat: Easy Portuguese Easter Delight highlights the key attractions of this recipe.
Quick Preparation Magic: Whip up this heavenly cake in just 45 minutes from start to finish, making it perfect for busy home bakers who want a delicious dessert without spending hours in the kitchen.
Minimal Ingredient Miracle: Requires only four basic pantry staples – eggs, sugar, flour, and baking powder – which means you can likely create this stunning cake without a special grocery trip.
Celebration-Ready Showstopper: Perfect for Easter gatherings, family reunions, or casual weekend desserts, this light and fluffy cake impresses guests while feeling comfortingly homemade and nostalgic.
Portuguese Easter Cake (Pao de Lo) Ingredients
Base Ingredients:Dry Ingredients:Pan and Preparation Ingredients:Easter Cake Traditional Baking Method
Step 1: Warm Up The Oven
Set your oven to a cozy 350°F.
Grab an 8-inch round cake pan and give it a friendly coating of grease and flour.
If you prefer, line the pan with parchment paper for an easy cake release.
Step 2: Whip Up The Creamy Base
Grab your mixing bowl and combine eggs and sugar.
Using a hand mixer or stand mixer, beat these ingredients on medium-high speed.
Watch the magic happen as the mixture transforms into a thick, pale cloud that creates soft, dreamy peaks.
This should take about 10-12 minutes – your mixture will triple in volume and cascade like silky ribbons.
Step 3: Prepare The Dry Ingredients
Take another bowl and sift together flour and baking powder.
This step ensures your dry ingredients are smooth and lump-free, creating a perfectly light texture.
Step 4: Gently Blend Ingredients
Carefully fold the sifted flour into your fluffy egg mixture.
Use a spatula and add the flour in small batches.
Move slowly and gracefully to preserve those precious air bubbles that will make your cake wonderfully light.
Step 5: Pour Into The Pan
Transfer your silky batter into the prepared pan.
Use a spatula to smooth the top, creating an even surface.
Step 6: Bake To Golden Perfection
Slide the pan into the preheated oven.
Bake for 25-30 minutes until the top turns a beautiful golden color.
Check doneness by inserting a toothpick – it should come out clean.
Step 7: Cool And Enjoy
Let the cake rest in the pan for 10 minutes.
Then transfer to a wire rack and allow it to cool completely.
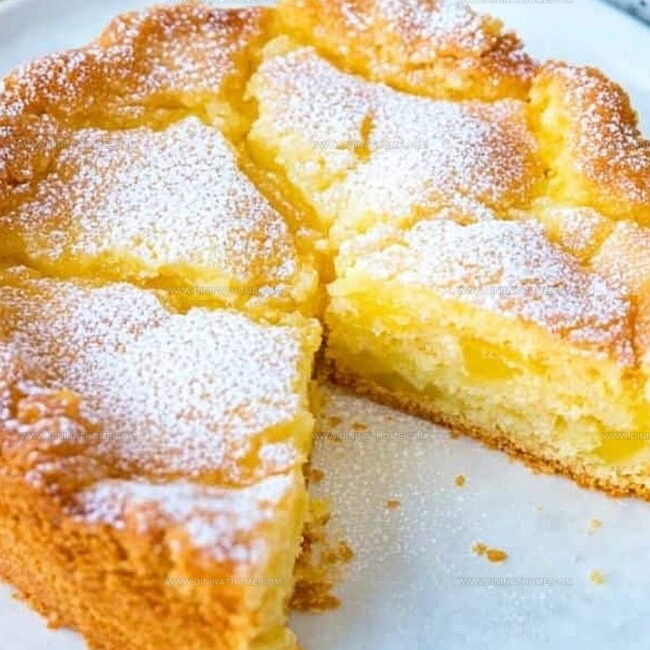
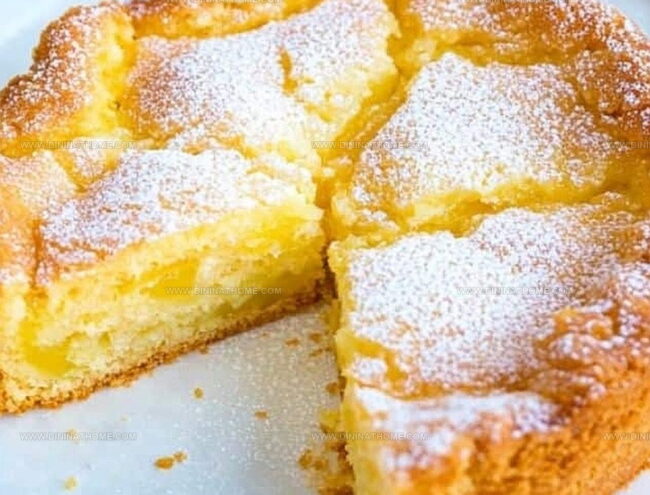
This traditional Portuguese cake tastes even better after resting, as the flavors settle and mingle.
Easter Cake Tips for Portuguese Pão de Ló
Portuguese Cake Leftover Help
Dessert Pairings for Easter Cake
Portuguese Easter Cake Fluffy Twists
FAQs
Pão de Ló is uniquely Portuguese, characterized by its incredibly light, airy texture achieved through extensive egg whipping. Unlike other sponge cakes, it uses a simple combination of eggs, sugar, and flour, creating a delicate, melt-in-your-mouth experience.
While technically possible, hand-whisking the eggs and sugar for 10-12 minutes to achieve the right volume and texture is extremely challenging. An electric mixer is strongly recommended to create the necessary volume and soft peaks.
Careful folding preserves the air bubbles created during egg whipping, which gives Pão de Ló its signature light, fluffy texture. Rough mixing or overmixing can deflate these bubbles, resulting in a dense, heavy cake.
Traditional Pão de Ló contains only eggs, sugar, and flour, making it naturally gluten-free if using gluten-free flour. However, it’s not suitable for those with egg allergies or following a vegan diet due to its egg-heavy composition.
Print
Portuguese Easter Cake Recipe
- Total Time: 45 minutes
- Yield: 8 1x
Description
Silky Portuguese Easter Cake (Pão de Ló) whispers centuries of family gatherings and delicate culinary heritage. Delightfully simple yet elegant, this sponge cake invites everyone to savor Portugal’s cherished springtime dessert.
Ingredients
Main Ingredients:
- 6 eggs
- 1 cup (200 grams) granulated sugar
- 1 cup (120 grams) plain all-purpose flour
Leavening and Flavoring:
- 1 teaspoon baking powder
- 1 teaspoon vanilla extract
Instructions
- Prepare the baking environment by warming the oven to 350°F (175°C) and preparing a round cake pan with a light coating of grease and flour or parchment paper to ensure easy cake removal.
- Transform eggs and sugar into a voluminous, airy mixture using an electric mixer, whipping vigorously for 10-12 minutes until the texture becomes pale, thick, and develops soft, ribbony peaks that dramatically increase in volume.
- Create a delicate dry ingredient base by meticulously sifting flour and baking powder together, eliminating potential lumps and ensuring smooth integration with the egg mixture.
- Carefully incorporate the sifted dry ingredients into the whipped egg mixture, using gentle folding techniques to preserve the delicate air bubbles that give the cake its signature lightness and fluffy texture.
- Delicately transfer the aerated batter into the prepared pan, using a spatula to spread the mixture evenly and create a smooth, uniform surface.
- Slide the pan into the preheated oven and bake for 25-30 minutes, monitoring for a golden-brown exterior and checking doneness with a toothpick that emerges clean when inserted into the cake’s center.
- Remove the cake from the oven and allow it to rest in the pan for 10 minutes, then gently transfer to a wire rack to complete cooling, letting the Portuguese Easter cake settle and develop its characteristic delicate flavor profile.
Notes
- Egg Temperature Matters: Bring eggs to room temperature before whipping to achieve maximum volume and create that signature fluffy texture.
- Gentle Folding Technique: Use a spatula with a light, cutting motion when incorporating flour to preserve the delicate air bubbles that give the cake its signature lightness.
- Moisture Preservation: Cover the cake with a clean kitchen towel after cooling to prevent drying out and maintain its soft, tender crumb.
- Gluten-Free Adaptation: Replace wheat flour with a 1:1 gluten-free flour blend to make the cake suitable for those with gluten sensitivities, ensuring you sift carefully to prevent clumping.
- Prep Time: 15 minutes
- Cook Time: 30 minutes
- Category: Desserts, Snacks
- Method: Baking
- Cuisine: Portuguese
Nutrition
- Serving Size: 8
- Calories: 190
- Sugar: 19 g
- Sodium: 70 mg
- Fat: 5 g
- Saturated Fat: 1.5 g
- Unsaturated Fat: 3.5 g
- Trans Fat: 0 g
- Carbohydrates: 30 g
- Fiber: 0 g
- Protein: 6 g
- Cholesterol: 150 mg
Emily Harper
Nutrition Consultant & Recipe Analyst
Expertise
Healthy Recipe Modification, Nutritional Analysis & Meal Planning, Global Cuisine & Dietary Adaptations
Education
School: French Pastry School, Chicago, IL
Program: L’Art de la Pâtisserie
Focus: Intensive training in traditional French pastry techniques, baking theory, and confectionery arts.
Emily’s journey started in a pastry kitchen but took a detour into the world of health and flavor science.
Graduating from the French Pastry School and studying nutrition opened her eyes to a new mission: making healthy food taste like something you’d actually crave.
At Dining At Home, Emily’s the go-to for smart, feel-good recipes that don’t trade flavor for nutrition.
She’s all about adding a fresh spin on old favorites and finding small ways to make everyday meals a little brighter.
Outside of the kitchen, Emily is most at home walking forest trails, testing plant-based recipes, or sharing a picnic under a wide-open sky.