
Irresistible Peanut Butter Blossom Bars Recipe for Sweet Smiles
Dreamy peanut butter blossom bars dance between classic cookie memories and modern sweet cravings.
Nostalgic flavors wrapped in a convenient rectangular shape make snacking effortless.
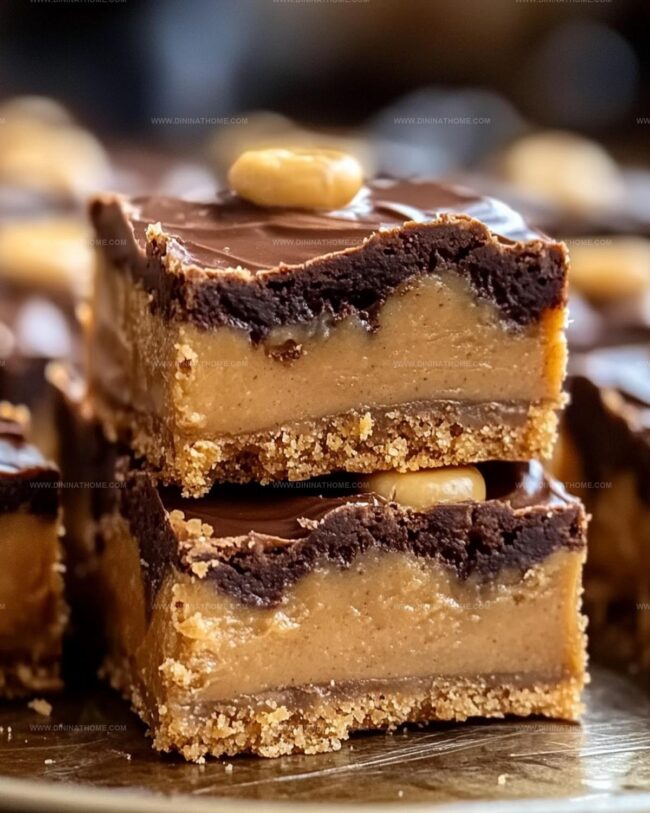
Chocolate kisses nestled atop rich, buttery squares create instant excitement for anyone who loves comfort desserts.
Soft, chewy textures promise pure indulgence with every single bite.
Baking these treats becomes a simple joy that connects generations through shared delight.
Weekend baking adventures just got more delicious with this crowd-pleasing recipe.
You cannot resist the temptation of these irresistible bars that blend traditional cookie charm with contemporary convenience.
Peanut Butter Blossom Bars That Disappear Quickly

Peanut Butter Blossom Bars – Ingredient Rundown
Cookie Base Ingredients:Wet Ingredients:Chocolate and Topping:How to Make Peanut Butter Blossom Bars from Scratch
Step 1: Prepare Cookie Dough Base
Grab a mixing bowl and combine softened butter with brown and white sugars.
Whisk until the mixture becomes creamy and light.
Blend in a smooth peanut butter, vanilla extract, and an egg, stirring until everything integrates perfectly.
In another bowl, sift together flour, baking soda, and a pinch of salt.
Gradually fold the dry ingredients into the wet mixture, creating a consistent, soft dough.
Step 2: Press Dough into Baking Pan
Take a rectangular baking pan and line it with parchment paper, allowing slight overhang for easy removal.
Spread the cookie dough evenly across the pan, using your fingers or a spatula to create a smooth, uniform layer.
Press the dough gently but firmly to ensure it covers the entire bottom of the pan.
Step 3: Bake the Cookie Base
Slide the pan into a preheated oven.
Bake until the edges turn golden brown and the center looks set but slightly soft.
The baking process typically takes around 15-20 minutes.
Remove from the oven and let the cookie base cool completely on a wire rack.
Step 4: Create Chocolate Topping
In a microwave-safe bowl, melt chocolate chips in short intervals, stirring between each to prevent burning.
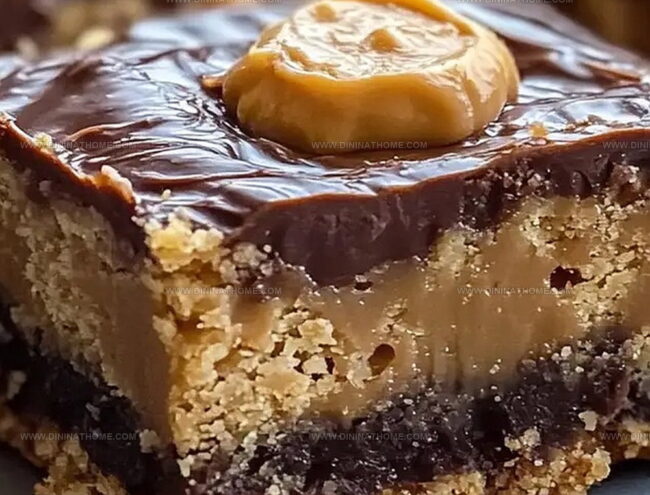
Once smooth and glossy, pour the melted chocolate over the cooled cookie base.
Use a spatula to spread the chocolate evenly across the surface.
Step 5: Add Decorative Peanut Butter Drizzle
Warm peanut butter slightly in the microwave until it becomes liquid enough to drizzle.
Using a spoon or piping bag, create zigzag patterns across the chocolate layer.
This adds visual appeal and extra peanut butter flavor.
Step 6: Chill and Set
Place the pan in the refrigerator for about 30 minutes.
This helps the chocolate and peanut butter topping firm up and creates clean, crisp cuts when slicing.
Step 7: Cut and Serve
Remove the bars from the pan using the parchment paper overhang.
Place on a cutting board and slice into neat squares.
Serve at room temperature for the best texture and flavor enjoyment.
Blossom Bar Tips for That Classic PB Cookie Finish
Store Peanut Butter Blossom Bars
Best Matches for Peanut Butter Blossom Bars
Blossom Bars Peanut Butter Mixes
FAQs
No, classic peanut butter blossoms are traditionally cookies. These bars offer a simplified, easier version of the beloved cookie with the same delicious flavors.
Stick with creamy, processed peanut butter like Jif or Skippy. Natural peanut butter has different oil content and might make the bars too dry or crumbly.
Look for golden edges and a slightly set center. The bars will continue to firm up as they cool, so don’t overbake. A toothpick inserted should come out with a few moist crumbs.
You can substitute with chocolate chips or chocolate chunks. Hershey’s Kisses create the classic look, but other chocolate options work just as well for topping the bars.
Print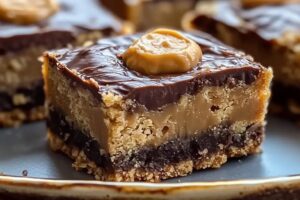
Peanut Butter Blossom Bars Recipe
- Total Time: 35 minutes
- Yield: 12 1x
Description
Indulgent peanut butter blossom bars merge classic cookie charm with irresistible chocolate-kissed simplicity. Crumbly, sweet layers deliver comforting nostalgia that draws hungry friends and family straight to the dessert plate.
Ingredients
Main Ingredients:
- 1 cup creamy peanut butter
- 1 cup unsalted butter, softened
- 1 large egg
- 2 cups all-purpose flour
Sweeteners and Flavor Enhancers:
- 1 cup granulated sugar
- 1 teaspoon vanilla extract
- 1/4 cup milk
Leavening and Seasoning:
- 1 teaspoon baking soda
- 1/2 teaspoon salt
Topping:
- 36 Hershey’s Kisses, unwrapped
Instructions
- Preheat the oven and line a baking pan with parchment paper, creating an easy-lift surface for later removal.
- Cream together butter, peanut butter, and sugars until the mixture becomes light and fluffy, ensuring a smooth base for the bars.
- Incorporate eggs and vanilla extract, mixing thoroughly to bind the wet ingredients and develop rich flavor.
- Gradually fold in flour, baking soda, and salt, stirring until a cohesive dough forms without overmixing.
- Press the dough evenly into the prepared pan, creating a uniform layer that will bake consistently.
- Bake in the preheated oven until the edges turn golden brown and the center appears set but slightly soft.
- Remove from the oven and immediately place chocolate kisses on top of the warm bars, gently pressing each one into the surface.
- Allow the bars to cool completely in the pan, which helps the chocolate kisses adhere and the base to set.
- Once cooled, lift the bars out using the parchment paper and slice into squares.
- Serve at room temperature, enjoying the perfect blend of soft peanut butter base and smooth chocolate topping.
Notes
- Swap traditional peanut butter for almond or sunflower seed butter to create a nut-free version perfect for school lunches or allergy-sensitive gatherings.
- Chill the dough for 30 minutes before baking to prevent excessive spreading and maintain a more compact bar shape.
- Press chocolate kisses gently into the warm bars immediately after baking to ensure they stick perfectly without sinking too deep into the cookie base.
- For a gluten-free adaptation, replace all-purpose flour with a cup-for-cup gluten-free flour blend, maintaining the same delicious texture and flavor profile.
- Prep Time: 15 minutes
- Cook Time: 20 minutes
- Category: Desserts, Snacks
- Method: Baking
- Cuisine: American
Nutrition
- Serving Size: 12
- Calories: 249
- Sugar: 18 g
- Sodium: 105 mg
- Fat: 16 g
- Saturated Fat: 7 g
- Unsaturated Fat: 8 g
- Trans Fat: 0 g
- Carbohydrates: 24 g
- Fiber: 1 g
- Protein: 5 g
- Cholesterol: 20 mg
James Walker
Lead Recipe Developer & Culinary Educator
Expertise
Southern Cuisine & Farm-to-Table Cooking, Recipe Development & Testing, Culinary Education & Instruction
Education
School: Auguste Escoffier School of Culinary Arts
Program: Diploma in Culinary Arts and Operations
Focus: Comprehensive training in classical and modern culinary techniques, kitchen operations, and farm-to-table practices.
James didn’t learn cooking from a TV show, he learned it from busy kitchens, family gatherings, and long afternoons spent testing recipes the hard way.
After training at the Auguste Escoffier School of Culinary Arts, he brought his love for real, down-to-earth food to every dish he makes.
At Dining At Home, James loves building recipes that feel familiar but still have something special, like adding a twist to a classic or making a slow Sunday dinner feel brand new.
When he’s not in the kitchen, you’ll probably find him swapping garden tips at the farmers’ market or teaching his daughter how to flip pancakes without a mess (almost).