
Dreamy Nutter Butter Cream Pie Recipe: Whipped PB Bliss
Creamy desserts reach new heights with this delectable nutter butter cream pie that promises pure indulgence.
Layers of rich peanut butter goodness melt into a dreamy landscape of sweet comfort.
Crunchy cookie crusts provide the perfect foundation for an irresistible filling that dances between decadence and nostalgia.
Smooth whipped textures blend seamlessly, creating a dessert that whispers luxury in every bite.
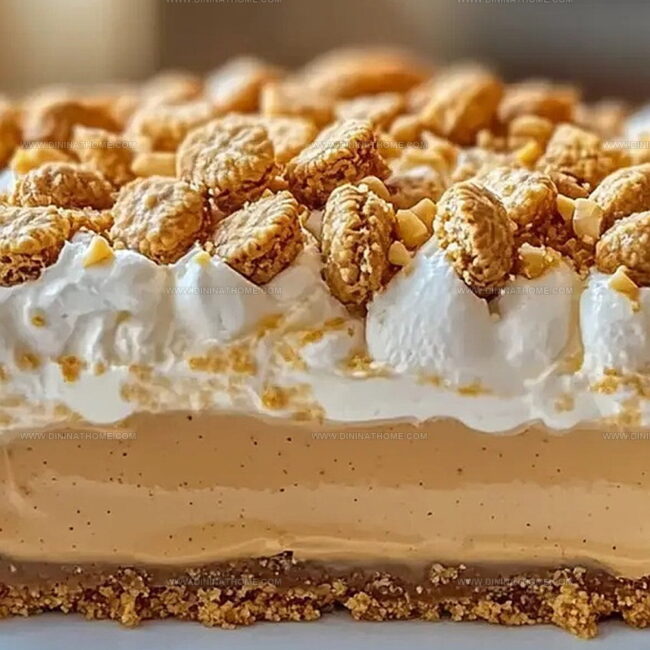
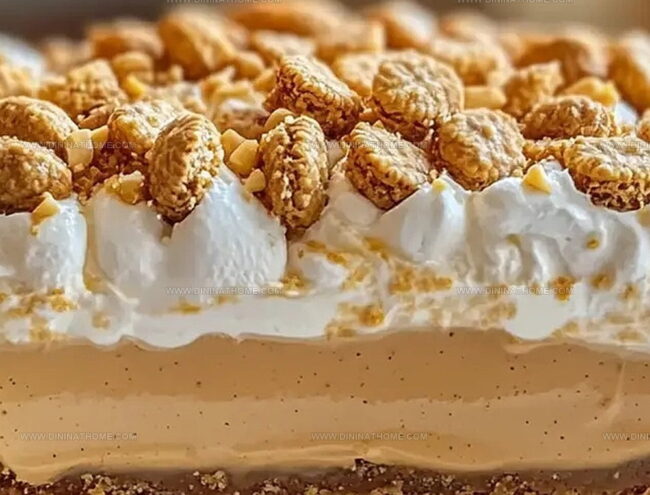
Silky peanut butter cream becomes the star of this delightful confection, inviting you to savor each heavenly spoonful.
Crisp nutter butter cookies crumble delicately, offering a delightful contrast to the luscious filling.
Prepare to fall in love with this ultimate peanut butter lover’s dream that will have everyone begging for seconds.
Creamy Nutter Butter Pie That’s Smooth and Dreamy
Nutter Butter Cream Pie Ingredient Mix
Pie Crust Base:Filling Ingredients:Topping and Garnish:Cream Pie Steps with Nutter Butter and Whipped PB Filling
Step 1: Whip the Creamy Peanut Butter Mixture
In a large mixing bowl, beat cream cheese until smooth and fluffy.
Gradually fold in powdered sugar, creamy peanut butter, and vanilla extract.
Gently fold in whipped cream until the mixture becomes light and airy.
Make sure all ingredients are fully blended for a silky, decadent filling.
Step 2: Prepare the Crunchy Cookie Crust
Crush Nutter Butter cookies into fine crumbs using a food processor or rolling pin.
Mix the cookie crumbs with melted butter until they hold together when pressed.
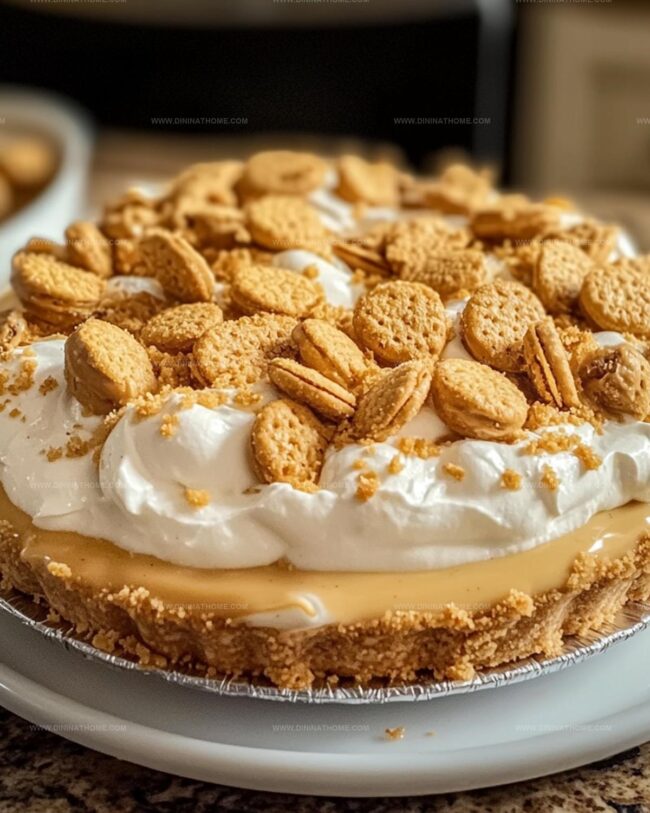
Press the mixture firmly into the bottom and sides of a 9-inch pie dish, creating an even layer.
Refrigerate the crust for about 15 minutes to set.
Step 3: Layer the Peanut Butter Filling
Carefully spread the whipped peanut butter mixture evenly over the chilled cookie crust.
Use a spatula to create smooth, gentle peaks.
Ensure the filling reaches all edges of the pie dish for a consistent texture.
Step 4: Chill and Set the Pie
Place the pie in the refrigerator for at least 4 hours or overnight.
This allows the filling to firm up and the flavors to meld together beautifully.
Step 5: Create the Whipped Cream Topping
Whip heavy cream with powdered sugar until stiff peaks form.
Pipe or spread the whipped cream on top of the chilled pie.
Step 6: Final Garnish and Decoration
Sprinkle additional crushed Nutter Butter cookies over the whipped cream.
Drizzle melted chocolate or peanut butter sauce in a decorative pattern.
Add a few whole Nutter Butter cookies on top for extra crunch and visual appeal.
Step 7: Serve and Enjoy
Remove the pie from the refrigerator about 10 minutes before serving to soften slightly.
Slice with a sharp knife and serve chilled.
Store any leftovers in the refrigerator for up to 3-4 days.
Whipped Pie Tips for a Nutter Butter Dream Filling
Chill Nutter Butter Cream Pie Leftovers
What Pairs Well with Nutter Butter Cream Pie
Nutter Butter Cream Pie Whipped Add-Ins
FAQs
The crust is made entirely from crushed Nutter Butter cookies, creating a deliciously rich peanut butter cookie base that perfectly complements the filling.
Creamy peanut butter works best. Avoid natural or separated peanut butter, as it can make the filling too runny and affect the texture of the pie.
No, this pie contains peanut butter and Nutter Butter cookies, making it unsafe for those with peanut allergies. Always check ingredients carefully if you have food sensitivities.
You can make the pie up to 2 days ahead of time. Keep it refrigerated and add any fresh whipped cream garnish just before serving to maintain the best texture and flavor.
Print
Nutter Butter Cream Pie With Whipped Peanut Butter Filling Recipe
- Total Time: 20 minutes
- Yield: 8 1x
Description
Indulgent Nutter Butter Cream Pie combines classic cookie crunch with silky peanut butter filling in a dreamy dessert. Creamy layers and crumbly crust promise a delightful sweet escape that beckons you to savor each irresistible bite.
Ingredients
Crust:
- 2 cups (about 20 cookies) Nutter Butter cookies, crushed
- 1/4 cup (60 milliliters) unsalted butter, melted
Filling:
- 1 cup (240 grams) creamy peanut butter
- 8 ounces (226 grams) cream cheese, softened
- 1 cup (120 grams) powdered sugar
- 1 teaspoon (5 milliliters) vanilla extract
- 1 1/2 cups (360 milliliters) heavy whipping cream, chilled
Garnish (optional):
- 1 cup whipped cream or whipped topping
- Crushed Nutter Butter cookies
- Peanut butter drizzle
Instructions
- Whip cream cheese in a large mixing bowl until smooth and creamy, ensuring no lumps remain.
- Gradually incorporate powdered sugar and peanut butter, blending until the mixture achieves a uniform, velvety consistency.
- Gently fold in whipped cream, creating a light and airy peanut butter filling that maintains its structural integrity.
- Spread a thin layer of chocolate sauce across the bottom of the prepared cookie crust to prevent soggy base.
- Carefully transfer the peanut butter filling into the chocolate-lined crust, smoothing the surface with a spatula for an even distribution.
- Refrigerate the pie for at least 4 hours, allowing the filling to set and develop a firm yet creamy texture.
- Prior to serving, create decorative swirls of whipped cream around the pie’s perimeter using a piping bag.
- Crush additional Nutter Butter cookies and sprinkle them over the whipped cream as a textural garnish.
- Drizzle melted chocolate in elegant zigzag patterns across the top for a visually appealing finish.
- Chill for an additional 15-20 minutes to ensure the pie is perfectly set and ready to be sliced and served.
Notes
- Prevent filling from becoming runny by ensuring cream cheese is completely softened at room temperature before mixing.
- For a lighter texture, whip heavy cream to stiff peaks before folding into the peanut butter mixture, creating an airy and luxurious filling.
- Enhance flavor depth by toasting crushed Nutter Butter cookies before creating the crust, which adds a subtle nutty complexity to the dessert.
- Consider using gluten-free Nutter Butter cookies and gluten-free graham crackers to make this pie suitable for those with gluten sensitivities.
- Prep Time: 20 minutes
- Cook Time: 0 minutes
- Category: Desserts
- Method: None
- Cuisine: American
Nutrition
- Serving Size: 8
- Calories: 400
- Sugar: 20 g
- Sodium: 250 mg
- Fat: 30 g
- Saturated Fat: 12 g
- Unsaturated Fat: 18 g
- Trans Fat: 0 g
- Carbohydrates: 30 g
- Fiber: 1 g
- Protein: 8 g
- Cholesterol: 50 mg
James Walker
Lead Recipe Developer & Culinary Educator
Expertise
Southern Cuisine & Farm-to-Table Cooking, Recipe Development & Testing, Culinary Education & Instruction
Education
School: Auguste Escoffier School of Culinary Arts
Program: Diploma in Culinary Arts and Operations
Focus: Comprehensive training in classical and modern culinary techniques, kitchen operations, and farm-to-table practices.
James didn’t learn cooking from a TV show, he learned it from busy kitchens, family gatherings, and long afternoons spent testing recipes the hard way.
After training at the Auguste Escoffier School of Culinary Arts, he brought his love for real, down-to-earth food to every dish he makes.
At Dining At Home, James loves building recipes that feel familiar but still have something special, like adding a twist to a classic or making a slow Sunday dinner feel brand new.
When he’s not in the kitchen, you’ll probably find him swapping garden tips at the farmers’ market or teaching his daughter how to flip pancakes without a mess (almost).