
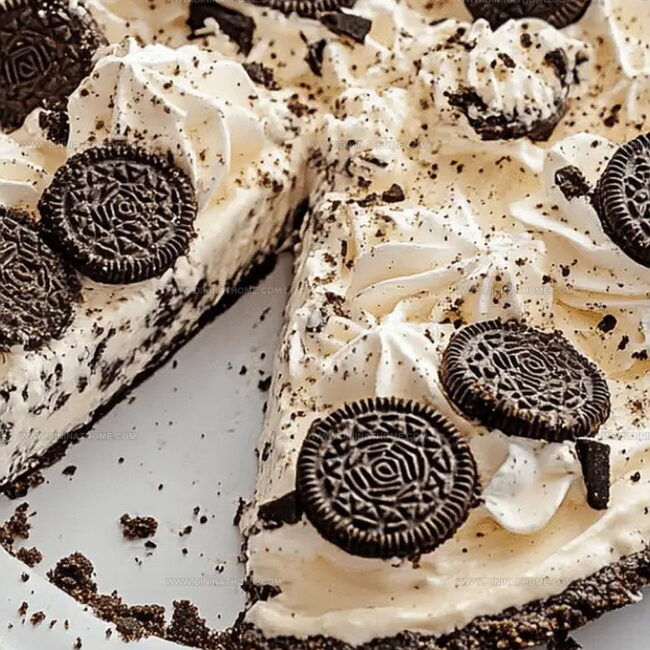
The Dreamiest No Bake Oreo Pie Recipe for Cookie Lovers
Whipping up a creamy no bake Oreo pie can transport you to dessert paradise in minutes.
Sweet chocolate cookies crumble perfectly into a smooth, velvety filling that melts in your mouth.
Cookies and cream create a classic combination everyone adores.
Minimal effort yields maximum deliciousness with this simple treat.
Minimal kitchen skills work magic for this decadent dessert.
Cool and refreshing, each slice promises pure indulgence without turning on the oven.
Grab a fork and dive into this irresistible chocolate dream that’ll have everyone asking for seconds.
No-Bake Oreo Pie That’s Creamy and Crowd-Pleasing
Whip Up Effortlessly: Perfect No-Effort Dessert that Saves Time and Delights Everyone
Quick Mix for a No-Bake Oreo Pie Base
Crust Ingredients:Filling Ingredients:Serving Ingredients:Oreo Pie No-Bake Dessert Guide

Step 1: Crush Oreo Cookies into Delightful Crumbs
Grab your food processor and toss in the Oreo cookies.
Pulse and blend until the cookies transform into fine, uniform crumbs that look like delicious chocolate sand.
Step 2: Mix Crumbs with Melted Butter
In a spacious mixing bowl, combine the cookie crumbs with melted butter.
Stir and blend thoroughly until the mixture looks like a cohesive, moist chocolate foundation.
Step 3: Form the Stunning Crust
Press the buttery crumb mixture firmly into a pie dish, creating an even layer that covers the bottom and sides.
Use the back of a spoon or your fingertips to compact the crust perfectly.
Slide the crust into the refrigerator and let it chill for half an hour to set.
Step 4: Whip Up the Creamy Filling
In another mixing bowl, blend cream cheese and powdered sugar until incredibly smooth and lump-free.
Gently fold in whipped topping to create a light, airy texture.
Sprinkle in chopped Oreo cookies for extra crunch and visual appeal.
Step 5: Assemble and Chill the Pie
Pour the luscious filling into the chilled Oreo crust, spreading it evenly with a spatula.
Return the pie to the refrigerator and let it rest for at least 4 hours, allowing the flavors to meld and the texture to set perfectly.
No-Bake Tips for Creamy Oreo Pie
No Bake Oreo Pie Storage
Easy Matches for No Bake Oreo Pie
No Bake Oreo Pie Sweet Options
FAQs
Yes, you can substitute Oreo cookies with graham crackers or chocolate wafers for a similar texture and flavor.
Make sure to press the crust firmly into the pie dish and chill it completely before adding the filling. This helps the crust hold together better.
Absolutely! This no-bake Oreo pie can be prepared up to 2 days in advance and stored in the refrigerator, making it perfect for planning ahead.
You can use low-fat cream cheese, light whipped topping, and reduced-fat Oreo cookies to create a slightly lighter version of the pie.
Print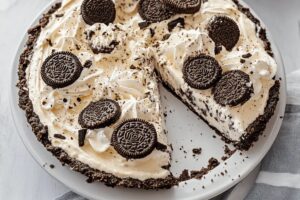
No Bake Oreo pie Recipe
- Total Time: 20 minutes
- Yield: 8 1x
Description
Creamy No Bake Oreo Pie delivers a delightful dessert experience with minimal effort. Cool chocolate cookie crust and luscious cream cheese filling create an irresistible treat you’ll crave again and again.
Ingredients
Main Ingredients:
- 25 Oreo cookies (the wafers and fillings)
- 8 ounces (226 grams) cream cheese
- 2 cups (480 milliliters) whipped topping, thawed
- 10 Oreo cookies, chopped
Binding Ingredients:
- 5 tablespoons (75 milliliters) unsalted butter, melted
Sweetening Ingredients:
- 3/4 cup (90 grams) powdered sugar
Instructions
- Transform whole Oreo cookies into fine, uniform crumbs using a food processor, ensuring no large chunks remain.
- Thoroughly incorporate melted butter with the Oreo crumbs, creating a cohesive, moistened mixture that will bind together seamlessly.
- Firmly press the crumb mixture into the bottom and sides of a pie dish, compacting it evenly to form a sturdy, uniform crust.
- Chill the prepared crust in the refrigerator for approximately 30 minutes, allowing it to set and become firm.
- In a separate mixing bowl, whip cream cheese until velvety smooth, gradually blending in powdered sugar to create a silky, sweet base.
- Gently fold whipped topping into the cream cheese mixture, creating a light, airy texture that will provide a delicate consistency.
- Carefully fold chopped Oreo cookies into the filling, distributing them evenly to ensure a consistent distribution of cookie pieces throughout.
- Carefully spread the creamy Oreo filling over the chilled crust, smoothing the top with a spatula to create an even surface.
- Refrigerate the pie for a minimum of 4 hours, allowing the filling to set completely and develop a rich, decadent flavor profile.
- Before serving, optionally garnish with additional crushed Oreo cookies or a light dusting of cocoa powder for an extra touch of indulgence.
Notes
- Choose dark chocolate Oreos for a richer, more intense chocolate flavor that deepens the pie’s overall taste profile.
- Freeze the crust for 15 minutes instead of refrigerating to create a firmer, more stable base that holds together perfectly.
- Use a food processor with a pulse setting to avoid over-crushing cookies, maintaining some small cookie chunks for added texture and visual appeal.
- Swap regular Oreos with gluten-free or vegan alternatives to accommodate different dietary restrictions without compromising the dessert’s deliciousness.
- Prep Time: 20 minutes
- Cook Time: 0 minutes
- Category: Desserts
- Method: None
- Cuisine: American
Nutrition
- Serving Size: 8
- Calories: 360
- Sugar: 22g
- Sodium: 250mg
- Fat: 24g
- Saturated Fat: 12g
- Unsaturated Fat: 8g
- Trans Fat: 0g
- Carbohydrates: 36g
- Fiber: 1g
- Protein: 3g
- Cholesterol: 30mg
Emily Harper
Nutrition Consultant & Recipe Analyst
Expertise
Healthy Recipe Modification, Nutritional Analysis & Meal Planning, Global Cuisine & Dietary Adaptations
Education
School: French Pastry School, Chicago, IL
Program: L’Art de la Pâtisserie
Focus: Intensive training in traditional French pastry techniques, baking theory, and confectionery arts.
Emily’s journey started in a pastry kitchen but took a detour into the world of health and flavor science.
Graduating from the French Pastry School and studying nutrition opened her eyes to a new mission: making healthy food taste like something you’d actually crave.
At Dining At Home, Emily’s the go-to for smart, feel-good recipes that don’t trade flavor for nutrition.
She’s all about adding a fresh spin on old favorites and finding small ways to make everyday meals a little brighter.
Outside of the kitchen, Emily is most at home walking forest trails, testing plant-based recipes, or sharing a picnic under a wide-open sky.