
Spooky Mummy Oreo Balls Recipe: Fun Halloween Treats
Let’s talk about a sweet treat that combines classic mummy oreo balls with a playful Halloween twist.
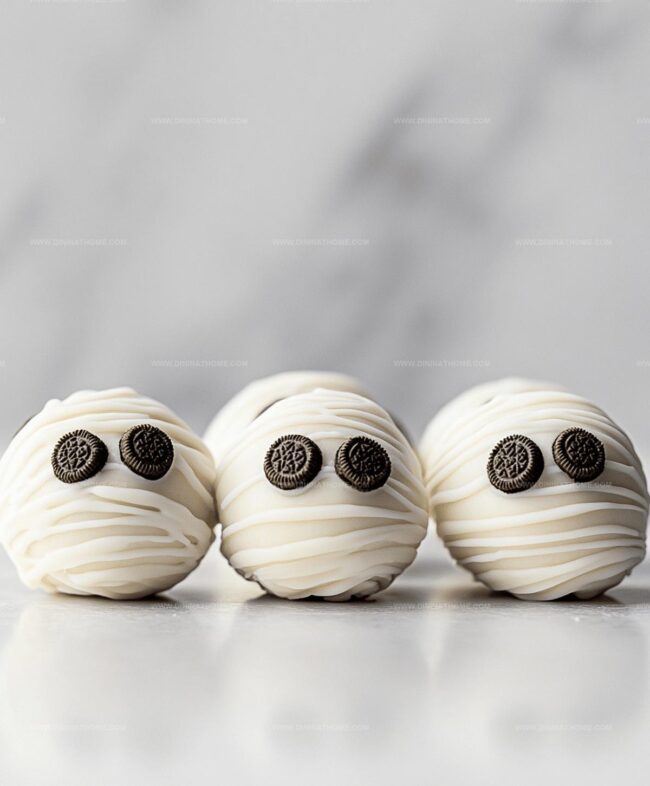
Creamy chocolate and cookie crumbs merge into adorable spooky shapes that will make everyone smile.
Mysterious and delightful, these dessert bites look like tiny wrapped mummies ready to charm your party guests.
White chocolate drizzles create delicate bandage-like patterns across each round treat.
Kids and adults alike will be enchanted by these cute confections that seem to peek out with candy eyes.
Minimal ingredients and simple steps mean you can whip up these adorable morsels in just minutes.
Prepare to unleash your inner dessert artist and create something wickedly delicious!
Mummy Oreo Balls Bring Fun To Any Party

Quick and Easy Halloween Treat: Perfect for Spooky Celebrations
Ingredient List For Mummy Oreo Balls
Oreo Base:Coating and Decoration:Mummy Oreo Balls No-Bake Instructions
Step 1: Blitz Oreo Cookies
Grab your food processor and pulse the Oreo cookies until they transform into fine, sandy crumbs.
Make sure no large chunks remain for a smooth texture.
Step 2: Blend Creamy Mixture
Combine the Oreo crumbs with softened cream cheese in a mixing bowl.
Use a spatula or your hands to create a uniform, moldable mixture that holds together perfectly.
Step 3: Shape Delightful Balls
Roll the mixture into small, evenly sized spheres using your palms.
Arrange the balls on a parchment-lined baking sheet, ensuring they’re not touching each other.
Step 4: Chill and Firm
Place the baking sheet in the freezer for 20-30 minutes.
This step helps the balls maintain their shape and makes dipping easier.
Step 5: Melt Chocolate Coating
Microwave white chocolate or candy melts in a microwave-safe bowl.
Heat in short 30-second intervals, stirring between each burst to prevent burning.
Step 6: Dunk and Cover
Carefully dip each frozen ball into the melted white chocolate.
Use a fork to lift and tap off excess chocolate, creating an even coating.
Step 7: Create Mummy Design
Before the chocolate sets, strategically place candy eyes on each ball.
Drizzle additional white chocolate in zigzag patterns to mimic mummy bandages.
Step 8: Set and Enjoy
Allow the Oreo balls to set at room temperature or in the refrigerator until the chocolate hardens completely.
Store in an airtight container for maximum freshness.
Mummy Oreo Balls – Tips For Assembling Neatly

Proper Way to Store and Reheat Mummy Oreo Balls
Mummy Oreo Balls Sweet Matches
Mummy Oreo Balls Spooky Additions
FAQs
Yes, this recipe is super simple and requires no baking. Even kids can help roll the balls and add candy eyes, making it a fun kitchen activity.
Use full-fat cream cheese at room temperature for the smoothest texture. Reduced-fat versions might make the mixture too soft.
When stored in an airtight container in the refrigerator, they’ll stay delicious for up to a week. Just keep them chilled to maintain their shape.
Absolutely! While white chocolate creates the mummy look, you can use milk or dark chocolate if you prefer. Just make sure to melt it carefully and smoothly.
Print
Mummy Oreo Balls Recipe
- Total Time: 20 minutes
- Yield: 12 1x
Description
Irresistible Mummy Oreo Balls bring spooky Halloween spirit to classic cookie treats. Creamy white chocolate coating and playful candy eyes make these festive desserts perfect for ghoulish gatherings, delighting guests with wickedly sweet charm.
Ingredients
Main Ingredients:
- 36 Oreo cookies
- 8 ounces (226 grams) cream cheese
- 12 ounces (340 grams) white chocolate or candy melts
Decoration:
- Candy eyes
Optional Ingredient:
- 1 teaspoon (5 milliliters) coconut oil
Instructions
- Pulverize Oreo cookies in a food processor until they transform into a fine, uniform powder.
- Blend the cookie crumbs with softened cream cheese, ensuring a smooth and cohesive mixture.
- Craft the mixture into compact, bite-sized spheres approximately one inch in diameter, positioning them carefully on a parchment-lined baking tray.
- Chill the orb-shaped treats in the freezer for a precise 20-30 minute interval to solidify their structure.
- Gently liquify white chocolate or candy melts within a microwave-safe vessel, pausing periodically to stir and prevent scorching.
- Delicately immerse each frozen oreo sphere into the molten white chocolate coating, ensuring complete coverage and returning them to the parchment-lined surface.
- While the chocolate remains glossy and fluid, strategically place candy eyes and artfully drape additional white chocolate strands to mimic intricate mummy bandage textures.
- Allow the confections to set and stabilize, either at ambient room temperature or within the refrigerator’s cool environment, until they achieve a firm, pristine consistency.
Notes
- Choose a food processor with sharp blades to create ultra-fine Oreo crumbs for smoother texture.
- Ensure cream cheese is at room temperature to blend seamlessly with cookie crumbs without lumps.
- Chill the Oreo mixture before rolling to prevent sticky hands and create perfectly round balls.
- Use candy melts instead of white chocolate for easier melting and a more stable coating.
- Cool the dipped Oreo balls quickly in the refrigerator to set the chocolate faster and prevent melting.
- Create gluten-free version by using gluten-free sandwich cookies and checking candy melts ingredients.
- Store mummy Oreo balls in an airtight container in the refrigerator for up to one week for maximum freshness.
- Prep Time: 20 minutes
- Cook Time: 0 minutes
- Category: Snacks, Desserts
- Method: None
- Cuisine: American
Nutrition
- Serving Size: 12
- Calories: 150
- Sugar: 10 g
- Sodium: 90 mg
- Fat: 8 g
- Saturated Fat: 5 g
- Unsaturated Fat: 3 g
- Trans Fat: 0 g
- Carbohydrates: 19 g
- Fiber: 0.5 g
- Protein: 2 g
- Cholesterol: 15 mg
James Walker
Lead Recipe Developer & Culinary Educator
Expertise
Southern Cuisine & Farm-to-Table Cooking, Recipe Development & Testing, Culinary Education & Instruction
Education
School: Auguste Escoffier School of Culinary Arts
Program: Diploma in Culinary Arts and Operations
Focus: Comprehensive training in classical and modern culinary techniques, kitchen operations, and farm-to-table practices.
James didn’t learn cooking from a TV show, he learned it from busy kitchens, family gatherings, and long afternoons spent testing recipes the hard way.
After training at the Auguste Escoffier School of Culinary Arts, he brought his love for real, down-to-earth food to every dish he makes.
At Dining At Home, James loves building recipes that feel familiar but still have something special, like adding a twist to a classic or making a slow Sunday dinner feel brand new.
When he’s not in the kitchen, you’ll probably find him swapping garden tips at the farmers’ market or teaching his daughter how to flip pancakes without a mess (almost).