
Quick Mini Lunchbox Pizzas Recipe: Adorable Bites Kids Love
Crafting mini lunchbox pizzas brings pure culinary joy to midday meals.
Small bites pack massive flavor into every delightful morsel.
Kids absolutely adore these compact cheesy delights that fit perfectly inside lunch containers.
Portable pizzas solve the lunchtime challenge with minimal preparation and maximum satisfaction.
Quick assembly means you can customize each little pizza with favorite toppings in minutes.
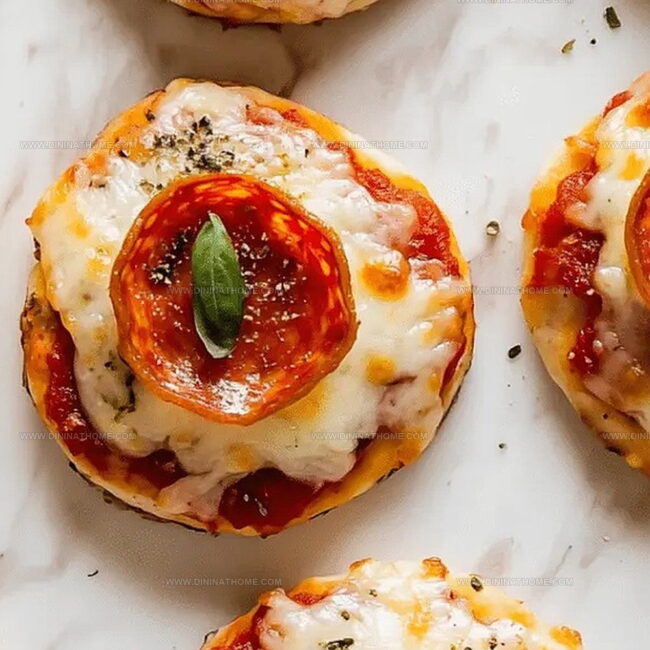
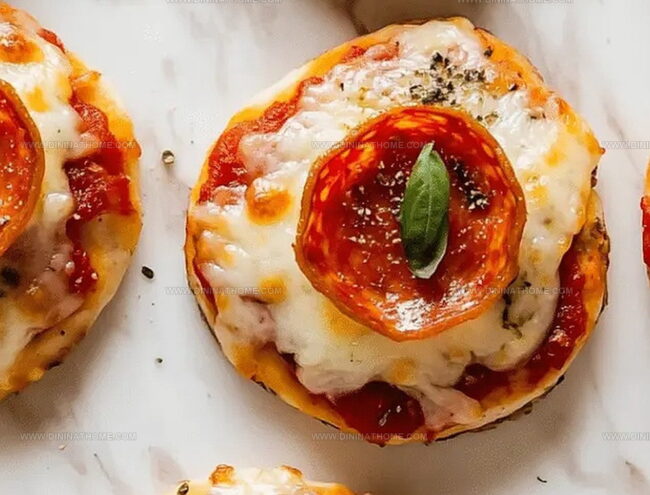
Crispy edges and melted cheese create an irresistible combination that sparks excitement at mealtime.
Pack these adorable mini pizzas and watch smiles bloom across hungry faces.
Lunchbox Pizzas That Make Mealtime Fun and Quick
What Goes Into Lunchbox-Ready Mini Pizzas
Pizza Base Ingredients:Sauce Ingredients:Topping Ingredients:Notes for Ingredients:Lunchbox Pizzas Mini Assembly Guide
Step 1: Prep the Oven and Baking Surface
Crank up your oven to 400°F (200°C).
Grab a baking tray and line it with parchment paper to prevent sticking and make cleanup a breeze.
Step 2: Create the Dough Magic
In a mixing bowl, combine self-raising flour and Greek yoghurt.
Knead the ingredients until they transform into a smooth, cohesive dough that’s ready to become delicious mini pizzas.
Step 3: Shape the Mini Pizza Bases
Divide the dough into equal portions.
Gently stretch and shape each portion into small, round pizza bases directly on the prepared baking tray.
Aim for uniform sizes to ensure even cooking.
Step 4: Layer on the Flavor
Spread a generous layer of tomato paste across each pizza base, covering the surface evenly.
Then add your toppings:Step 5: Bake to Perfection
Slide the tray into the preheated oven.
Bake for 12-15 minutes, watching for these delicious signs:Step 6: Cool and Pack
Remove the mini pizzas from the oven and let them cool for a few minutes.
This helps them set and makes them easier to handle.
Once they’re just warm, carefully transfer to lunchboxes for a delightful midday treat.
Mini Lunchbox Pizza Prep Tips
Lunchbox Pizzas Storage Plan
Snacks and Dips for Lunchbox Pizzas
Mini Lunchbox Pizzas Kid-Friendly Versions
FAQs
You’ll need to add 1 1/2 teaspoons of baking powder per cup of all-purpose flour to achieve the same rising effect as self-raising flour.
Greek yoghurt helps create a light, soft texture and adds protein. If unavailable, you can substitute with plain regular yoghurt, but the consistency might be slightly different.
Replace pepperoni with vegetables like bell peppers, mushrooms, or olives to create a vegetarian version of these mini pizzas.
Absolutely! Kids can help mix the dough, shape the pizza bases, and add toppings under adult supervision, making it a fun cooking activity.
Print
Mini Lunchbox Pizzas Recipe
- Total Time: 30 minutes
- Yield: 4 1x
Description
Playful mini lunchbox pizzas pack a punch of flavor in bite-sized perfection, turning ordinary lunches into delightful culinary adventures. Small pizzas deliver big smiles, ensuring each compact slice brings maximum enjoyment for kids and adults alike.
Ingredients
Main Pizza Ingredients:
- 2 cups (300 g) self-raising flour
- 1 cup (250 g) full-fat plain Greek yoghurt
- 1 cup (125 g) freshly shredded mozzarella
- 1/2 cup (80 g) pepperoni
Sauce Ingredient:
- 1/3 cup (90 g) tomato paste
INSIDE_INGREDIENTS
Instructions
- Prepare a baking tray by lining it with parchment paper and heat the oven to 400F (200C) for optimal baking conditions.
- Create a smooth, elastic dough by thoroughly mixing self-raising flour and Greek yoghurt in a mixing bowl until a cohesive texture forms.
- Carefully divide the prepared dough into uniform portions, gently stretching and shaping each piece into compact, round pizza bases directly on the parchment-lined tray.
- Apply a thin, even layer of tomato paste across each miniature pizza base, ensuring complete coverage for maximum flavor.
- Generously sprinkle mozzarella cheese over the tomato paste, creating a melty foundation for the toppings.
- Strategically arrange pepperoni slices on top of the cheese, distributing them evenly to guarantee a delicious bite in every mini pizza.
- Transfer the prepared pizzas into the preheated oven and bake for 12-15 minutes, watching for golden edges and fully melted, bubbling cheese.
- Remove the mini pizzas from the oven and let them rest for a few minutes, allowing the cheese to set and the base to achieve the perfect crispy texture.
- Once slightly cooled, carefully transfer the mini pizzas to lunchboxes, ensuring they remain intact and appetizing for later enjoyment.
Notes
- Swap yogurt types for dietary needs like using dairy-free or low-fat versions to accommodate different nutritional requirements.
- Knead dough gently to prevent tough crusts, ensuring a light and fluffy texture for these mini pizzas.
- Experiment with alternative toppings like ham, vegetables, or plant-based proteins to create diverse flavor profiles and cater to various preferences.
- Prepare pizzas in advance and freeze before baking, allowing quick and convenient meal preparation for busy families or school lunches.
- Prep Time: 15 minutes
- Cook Time: 15 minutes
- Category: Lunch, Snacks
- Method: Baking
- Cuisine: Italian
Nutrition
- Serving Size: 4
- Calories: 450
- Sugar: 3 g
- Sodium: 800 mg
- Fat: 20 g
- Saturated Fat: 9 g
- Unsaturated Fat: 8 g
- Trans Fat: 0 g
- Carbohydrates: 44 g
- Fiber: 2 g
- Protein: 21 g
- Cholesterol: 50 mg
Emily Harper
Nutrition Consultant & Recipe Analyst
Expertise
Healthy Recipe Modification, Nutritional Analysis & Meal Planning, Global Cuisine & Dietary Adaptations
Education
School: French Pastry School, Chicago, IL
Program: L’Art de la Pâtisserie
Focus: Intensive training in traditional French pastry techniques, baking theory, and confectionery arts.
Emily’s journey started in a pastry kitchen but took a detour into the world of health and flavor science.
Graduating from the French Pastry School and studying nutrition opened her eyes to a new mission: making healthy food taste like something you’d actually crave.
At Dining At Home, Emily’s the go-to for smart, feel-good recipes that don’t trade flavor for nutrition.
She’s all about adding a fresh spin on old favorites and finding small ways to make everyday meals a little brighter.
Outside of the kitchen, Emily is most at home walking forest trails, testing plant-based recipes, or sharing a picnic under a wide-open sky.