Red Velvet Cinnamon Rolls Recipe: A Heavenly Sweet Treat
Crafting these delectable red velvet cinnamon rolls will transport you to a realm of pure indulgence.
Sweet aromas will dance through your kitchen, promising an unforgettable baking adventure.
Soft, pillowy dough swirled with rich crimson hues beckons your culinary creativity.
Delicate layers promise a sensory experience that melts effortlessly on your tongue.
Hints of cocoa and warm spices weave magic into every decadent bite.
Bakers of all skill levels can confidently tackle this charming recipe with ease.
Each roll represents a small celebration of comfort and joy that you won’t want to miss.
Red Velvet Cinnamon Rolls That Taste Bakery-Made
What Makes Red Velvet Rolls Taste So Festive
Base Ingredients:Dough Enhancement Ingredients:Filling and Topping Ingredients:Frosting Ingredients:Red Velvet Cinnamon Rolls Sweet Prep
Step 1: Activate the Yeast Magic
Grab a large mixing bowl and pour in warm milk.
Sprinkle yeast over the surface and let it dance and bubble for 5-10 minutes until it becomes wonderfully frothy.
Add melted butter, a cracked egg, vanilla extract, and a splash of vibrant red food coloring.
Stir everything together until the mixture looks smooth and exciting.
Step 2: Create the Dough Base
In a separate bowl, whisk together:Slowly fold the dry ingredients into the wet mixture, stirring until a soft, luxurious dough forms.
Transfer the dough to a lightly floured surface and knead with love for 5-7 minutes.
The dough should become silky smooth and elastic.
Step 3: Let the Dough Rise
Place the dough in a greased bowl, cover it with a clean kitchen towel, and let it rest in a warm spot.
Watch it grow and double in size over about an hour.
Step 4: Craft the Delicious Filling
In a small bowl, blend together:Mix until the ingredients create a heavenly, fragrant spread.
Step 5: Roll Out the Deliciousness
Punch down the risen dough and roll it into a generous rectangle.
Spread the cinnamon-sugar mixture evenly across the surface.
Sprinkle mini chocolate chips for extra excitement if desired.
Step 6: Shape the Rolls
Carefully roll the dough into a tight log from the longer side.
Slice the log into 12 perfect, mouth-watering rolls.
Step 7: Final Rise
Nestle the rolls in a greased baking dish.
Cover and let them rise again for about 30 minutes.
Step 8: Bake to Perfection
Preheat the oven to 350°F.
Bake the rolls for 25-30 minutes until they turn a beautiful golden brown.
Step 9: Whip Up Creamy Frosting
Beat cream cheese and butter until silky smooth.
Gradually add:Whip until the frosting reaches a dreamy consistency.
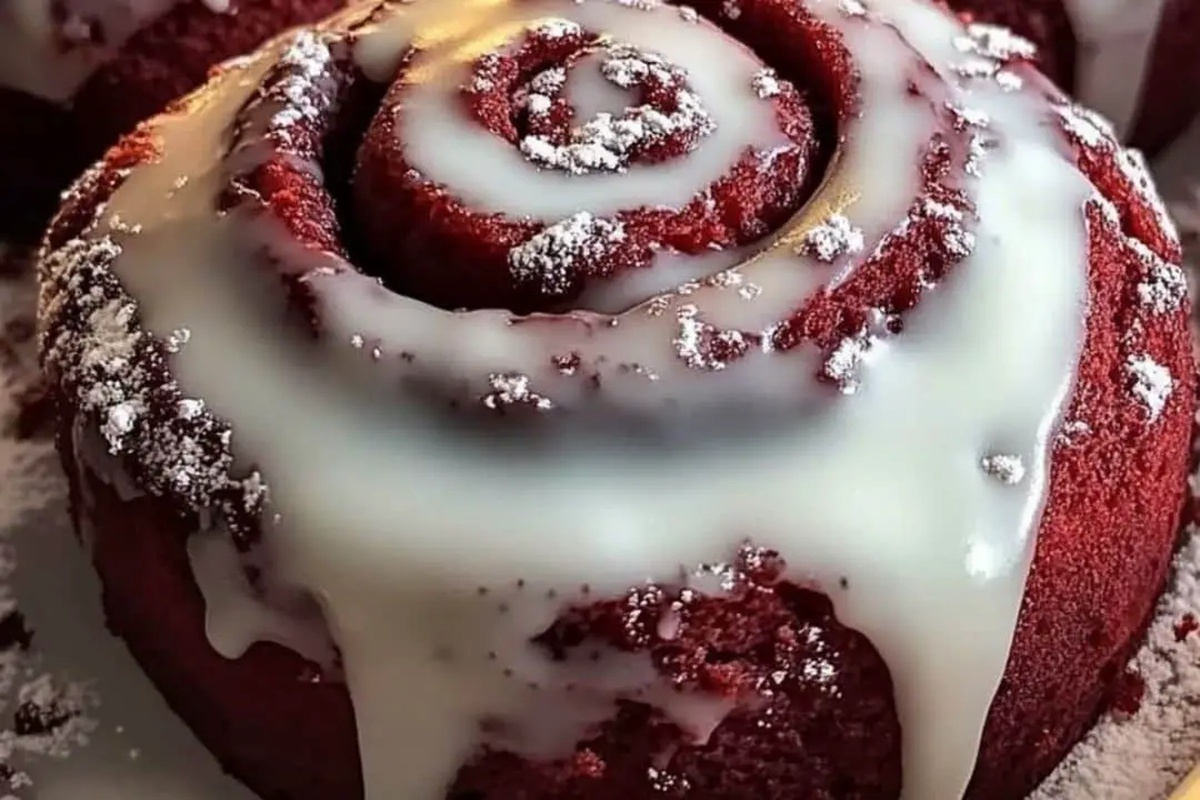
Step 10: Finish and Serve
Once the rolls are slightly cooled, generously spread the cream cheese frosting on top.
Serve warm and watch everyone’s eyes light up with joy!
Red Velvet Cinnamon Roll Baking Tips
Red Velvet Cinnamon Rolls Storage
Sweet Sips With Red Velvet Cinnamon Rolls
Red Velvet Cinnamon Rolls Sweet Twists
FAQs
Cocoa powder adds a subtle chocolate flavor and helps create the signature deep red color characteristic of red velvet desserts. It provides a rich, nuanced taste that enhances the overall sweetness of the rolls.
Yes, you can use natural red food coloring like beetroot powder or reduce the amount of food coloring. Some bakers even skip the coloring entirely, focusing on the delicious flavor of the rolls.
The dough should become smooth, elastic, and slightly tacky but not sticky. When you gently press the dough, it should spring back slowly, indicating it’s been kneaded sufficiently and developed enough gluten.
The key is allowing proper rising time, using warm (not hot) milk for the yeast, and not over-flouring the dough. Gentle handling and avoiding adding too much flour during kneading will help maintain the rolls’ soft texture.
Print
Heavenly Red Velvet Cinnamon Rolls Recipe
- Total Time: 55 minutes
- Yield: 12 1x
Description
Indulgent red velvet cinnamon rolls bring Southern charm to classic breakfast pastries. Warm, swirled with rich cream cheese frosting, these rolls promise a delightful morning experience you’ll savor with pure breakfast bliss.
Ingredients
Dough Ingredients:
- 3.5 cups all-purpose flour
- 2 tablespoons unsweetened cocoa powder
- 1 cup warm whole milk (110F/43C)
- 2.25 teaspoons active dry yeast (1 packet)
- 1 large egg, room temperature
- 1/4 cup granulated sugar
- 1/4 cup unsalted butter, melted
- 2 tablespoons red food coloring
- 1 teaspoon vanilla extract
- 1 teaspoon salt
Filling Ingredients:
- 3/4 cup brown sugar, packed
- 1/2 cup unsalted butter, softened
- 2 tablespoons ground cinnamon
- 1/2 cup mini chocolate chips (optional)
Cream Cheese Frosting Ingredients:
- 8 ounces cream cheese, softened
- 1/2 cup unsalted butter, softened
- 4 cups powdered sugar
- 2 teaspoons vanilla extract
- 24 tablespoons milk (1.5 cups)
Instructions
- Craft the dough foundation by whisking warm milk with sugar, then sprinkle yeast and allow it to bloom for 5-10 minutes until foamy and fragrant.
- Incorporate melted butter, egg, vanilla, and vibrant red food coloring into the activated yeast mixture, stirring until thoroughly integrated.
- Separately combine flour, cocoa powder, and salt, then gradually fold into the liquid ingredients to create a supple, cohesive dough.
- Transfer the dough onto a lightly floured workspace and knead methodically for 6-8 minutes, developing gluten and achieving a silky, elastic texture.
- Nestle the dough into a greased vessel, drape with a clean towel, and let it rise in a cozy environment until it doubles in volume, approximately 60-75 minutes.
- Prepare the filling by blending softened butter with brown sugar and ground cinnamon until smooth and well-combined.
- After the dough’s initial rise, gently deflate and roll into a rectangular shape, spreading the cinnamon mixture evenly across the surface.
- Scatter mini chocolate chips across the dough if desired, then tightly roll from the longer edge to create a compact log.
- Slice the log into 12 uniform rolls and arrange them in a generously greased baking dish.
- Allow a second gentle rise for 25-35 minutes, permitting the rolls to expand and become pillowy.
- Preheat the oven to 350°F and bake until the rolls transform into a rich, golden-brown hue, approximately 22-28 minutes.
- While baking, whip cream cheese and butter until creamy, gradually introducing powdered sugar, vanilla, and milk to create a luxurious frosting.
- Once baked, let the rolls rest momentarily, then lavishly coat with the cream cheese frosting.
- Serve warm, inviting everyone to savor these decadent red velvet cinnamon rolls.
Notes
- Ensure milk is lukewarm, not hot, to prevent killing the yeast and compromising dough rise.
- Use cocoa powder sparingly to maintain vibrant red color while adding subtle chocolate undertones.
- Knead dough until windowpane test passes, indicating gluten development for soft, tender rolls.
- Allow sufficient rising time in a draft-free, warm spot to develop maximum flavor and texture.
- Substitute regular flour with gluten-free blend for celiac-friendly version, adding xanthan gum for structure.
- Replace whole milk with almond or oat milk for dairy-free alternative without sacrificing moisture.
- Reduce sugar content by using monk fruit sweetener or stevia for low-carb dietary needs.
- Room temperature ingredients blend more smoothly and create consistent dough texture.
- Prep Time: 30 minutes
- Cook Time: 25 minutes
- Category: Breakfast, Desserts, Snacks
- Method: Baking
- Cuisine: American
Nutrition
- Serving Size: 12
- Calories: 350
- Sugar: 25 g
- Sodium: 250 mg
- Fat: 15 g
- Saturated Fat: 9 g
- Unsaturated Fat: 4 g
- Trans Fat: 0 g
- Carbohydrates: 48 g
- Fiber: 1 g
- Protein: 4 g
- Cholesterol: 45 mg
Emily Harper
Nutrition Consultant & Recipe Analyst
Expertise
Healthy Recipe Modification, Nutritional Analysis & Meal Planning, Global Cuisine & Dietary Adaptations
Education
School: French Pastry School, Chicago, IL
Program: L’Art de la Pâtisserie
Focus: Intensive training in traditional French pastry techniques, baking theory, and confectionery arts.
Emily’s journey started in a pastry kitchen but took a detour into the world of health and flavor science.
Graduating from the French Pastry School and studying nutrition opened her eyes to a new mission: making healthy food taste like something you’d actually crave.
At Dining At Home, Emily’s the go-to for smart, feel-good recipes that don’t trade flavor for nutrition.
She’s all about adding a fresh spin on old favorites and finding small ways to make everyday meals a little brighter.
Outside of the kitchen, Emily is most at home walking forest trails, testing plant-based recipes, or sharing a picnic under a wide-open sky.