
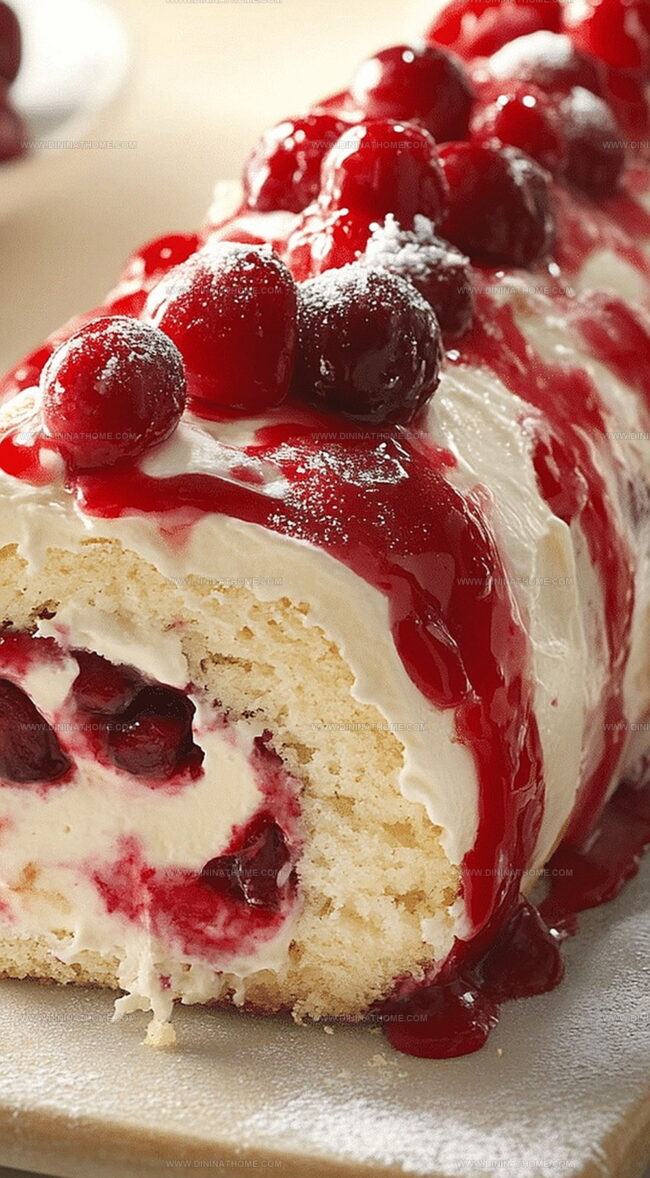
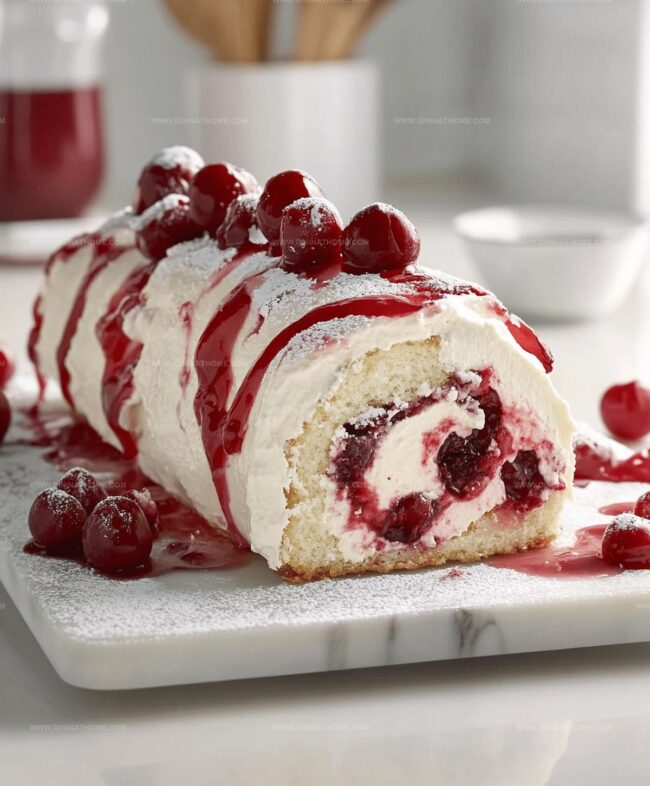
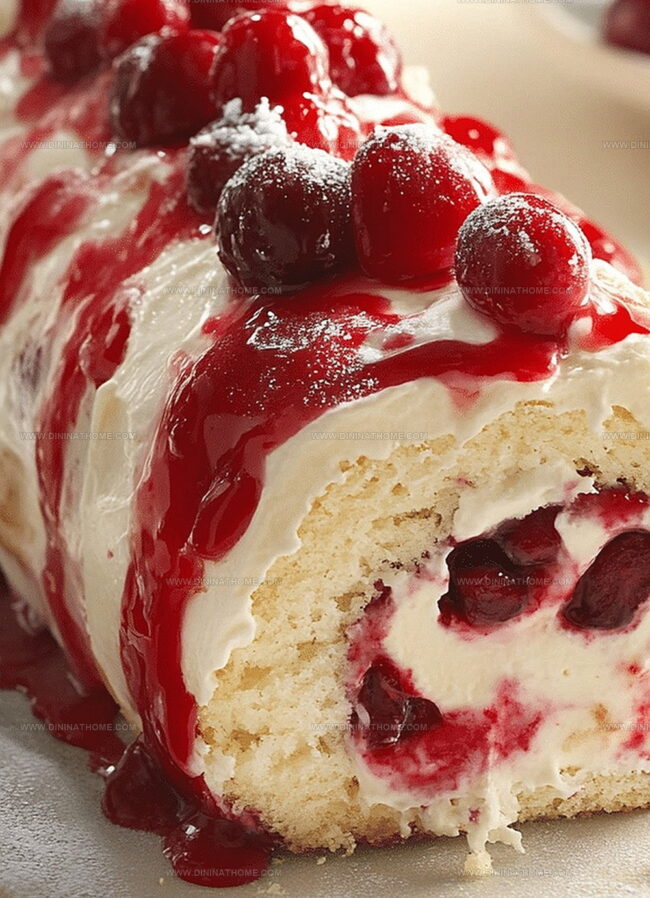
Heavenly Cherry Cheesecake Cake Roll Recipe: Sweet Spiral Delight
Creamy swirls of heavenly cherry cheesecake cake roll dance across my favorite dessert canvas.
Sweet memories flood back from childhood summers.
Delicate layers promise pure indulgence with every delectable bite.
Cherry ribbons weave through soft, pillowy cake like edible artwork.
Silky cream cheese filling whispers decadent secrets between tender rolls.
Light textures promise a magical experience that melts gracefully on your tongue.
Sweet dreams await in this irresistible culinary adventure.
Let’s uncover deliciousness together!
Cherry Cheesecake Cake Roll Satisfies Every Sweet Craving
Cherry Cheesecake Cake Roll Mix
Main Cake and Filling Components:Cream Cheese Filling:Topping and Finishing:Cherry Cheesecake Cake Roll Baking Instructions
Step 1: Warm Up the Oven
Preheat your oven to a cozy 350°F and grab a jelly roll pan.
Line it with parchment paper, creating a smooth surface for your cake adventure.
Step 2: Whip Up the Cake Base
Grab your mixer and blend eggs and sugar until they transform into a fluffy cloud-like mixture.
Splash in vanilla extract for that extra flavor punch.
Gently sift flour and baking powder over the mixture, folding everything together with love.
Step 3: Spread and Bake
Pour the batter into your prepared pan, using a spatula to create an even, delicate layer.
Slide the pan into the oven and let it bake for 12-15 minutes until golden and springy to the touch.
Step 4: Create the Cake Roll
Once out of the oven, immediately transfer the cake onto a clean kitchen towel.
Carefully roll the warm cake with the towel, creating the perfect shape for your future masterpiece.
Let it cool completely.
Step 5: Whip Up the Creamy Filling
In a mixing bowl, combine:Beat these ingredients until they become a smooth, dreamy mixture that will make your taste buds dance.
Step 6: Assemble the Cake Roll
Gently unroll the cooled cake.
Spread the luscious cream cheese mixture across the surface.
Generously spoon cherry filling over the cream cheese layer, creating beautiful swirls of fruity goodness.
Step 7: Final Roll and Chill
Carefully roll the cake back up, sealing in all those delicious layers.
Dust the top with a light snowfall of confectioners’ sugar.
Refrigerate for a few hours to let all the flavors mingle and set.
Step 8: Serve and Enjoy
Slice and serve this heavenly cherry cheesecake cake roll, watching as your guests’ eyes light up with pure dessert delight!
Cherry Cheesecake Roll – Tips For Rolling Without Cracks
Cherry Cheesecake Cake Roll: How to Store and Reheat
Sweet Side Picks for Cherry Cheesecake Roll
Pair Creamy Cherry Cheesecake Roll with:Cherry Cheesecake Cake Roll Celebration Variants
FAQs
Immediately after baking, roll the cake in a clean kitchen towel while it’s still warm. This helps create flexibility and prevents cracking when you add the filling later.
Absolutely! Strawberry, blueberry, or raspberry preserves work great as alternatives. Choose a fruit filling that complements the creamy cheesecake mixture.
Sifting removes lumps and aerates the flour, ensuring a lighter, more tender cake texture. It helps create a smooth batter and prevents dense, heavy cake layers.
Yes, chilling helps the filling set and makes slicing easier. It also allows the flavors to meld together, creating a more cohesive and delicious dessert.
Print
Heavenly Cherry Cheesecake Cake Roll Recipe
- Total Time: 35 minutes
- Yield: 8 1x
Description
Delightful cherry cheesecake cake roll merges creamy cheesecake with sweet cherry essence in one spectacular dessert. Rich layers of delicate cake and smooth filling promise pure indulgence that will charm all dessert enthusiasts.
Ingredients
Main Ingredients:
- 4 Eggs
- 1/2 cup Granulated sugar
- 1/2 cup All-purpose flour
- 8 ounces (226 grams) Cream cheese
- 1 cup Cherry pie filling
Dairy and Flavor Enhancers:
- 1 teaspoon Vanilla extract
- 1/4 cup Heavy cream
- 1/2 cup Powdered sugar
- Confectioners’ sugar (for dusting)
Leavening Agent:
- 1 teaspoon Baking powder
Instructions
- Carefully prepare a jelly roll pan by lining it with parchment paper and ensuring the surface is smooth.
- Whip eggs and sugar together until they transform into a light, airy mixture with notable volume and pale coloration.
- Incorporate vanilla extract into the egg mixture, then gently fold in sifted flour and baking powder until just combined.
- Distribute the cake batter evenly across the prepared pan, creating a uniform layer that will ensure consistent baking.
- Transfer the pan to a preheated oven and bake until the cake develops a delicate golden hue and springs back when lightly touched.
- Immediately after removing from the oven, flip the warm cake onto a clean kitchen towel dusted with powdered sugar.
- Carefully roll the cake with the towel, allowing it to cool completely while maintaining its cylindrical shape.
- Whisk cream cheese until smooth, gradually blending in powdered sugar and heavy cream to create a silky cheesecake filling.
- Gently unroll the cooled cake, ensuring it remains intact during the process.
- Spread the cream cheese mixture across the interior surface, leaving a small border around the edges.
- Delicately spoon cherry filling over the cream cheese layer, distributing it evenly.
- Carefully re-roll the cake, tucking in the edges to seal the filling.
- Refrigerate the cake roll for several hours to allow flavors to meld and filling to set.
- Before serving, dust the exterior with a light layer of confectioners’ sugar for an elegant finish.
Notes
- Carefully spread batter evenly to ensure uniform thickness, preventing dry or tough spots in the cake roll.
- Roll the cake in a towel while warm to prevent cracking and help maintain flexibility for easier filling and rolling later.
- Swap fresh or frozen cherries based on seasonal availability, adjusting sweetness with additional sugar if needed.
- Replace wheat flour with a gluten-free blend to make the recipe suitable for those with wheat sensitivities.
- Prep Time: 20 minutes
- Cook Time: 15 minutes
- Category: Desserts
- Method: Baking
- Cuisine: American
Nutrition
- Serving Size: 8
- Calories: 250
- Sugar: 20 g
- Sodium: 150 mg
- Fat: 12 g
- Saturated Fat: 7 g
- Unsaturated Fat: 5 g
- Trans Fat: 0 g
- Carbohydrates: 32 g
- Fiber: 1 g
- Protein: 4 g
- Cholesterol: 80 mg
James Walker
Lead Recipe Developer & Culinary Educator
Expertise
Southern Cuisine & Farm-to-Table Cooking, Recipe Development & Testing, Culinary Education & Instruction
Education
School: Auguste Escoffier School of Culinary Arts
Program: Diploma in Culinary Arts and Operations
Focus: Comprehensive training in classical and modern culinary techniques, kitchen operations, and farm-to-table practices.
James didn’t learn cooking from a TV show, he learned it from busy kitchens, family gatherings, and long afternoons spent testing recipes the hard way.
After training at the Auguste Escoffier School of Culinary Arts, he brought his love for real, down-to-earth food to every dish he makes.
At Dining At Home, James loves building recipes that feel familiar but still have something special, like adding a twist to a classic or making a slow Sunday dinner feel brand new.
When he’s not in the kitchen, you’ll probably find him swapping garden tips at the farmers’ market or teaching his daughter how to flip pancakes without a mess (almost).