
Spooky Halloween Bloodshot Eyeballs Candy Recipe That Kids Love
Crafting spooky halloween bloodshot eyeballs candy became my delightful obsession last autumn when I wanted to surprise my nieces.
Eerie treats always spark excitement among little monsters craving something wickedly sweet.
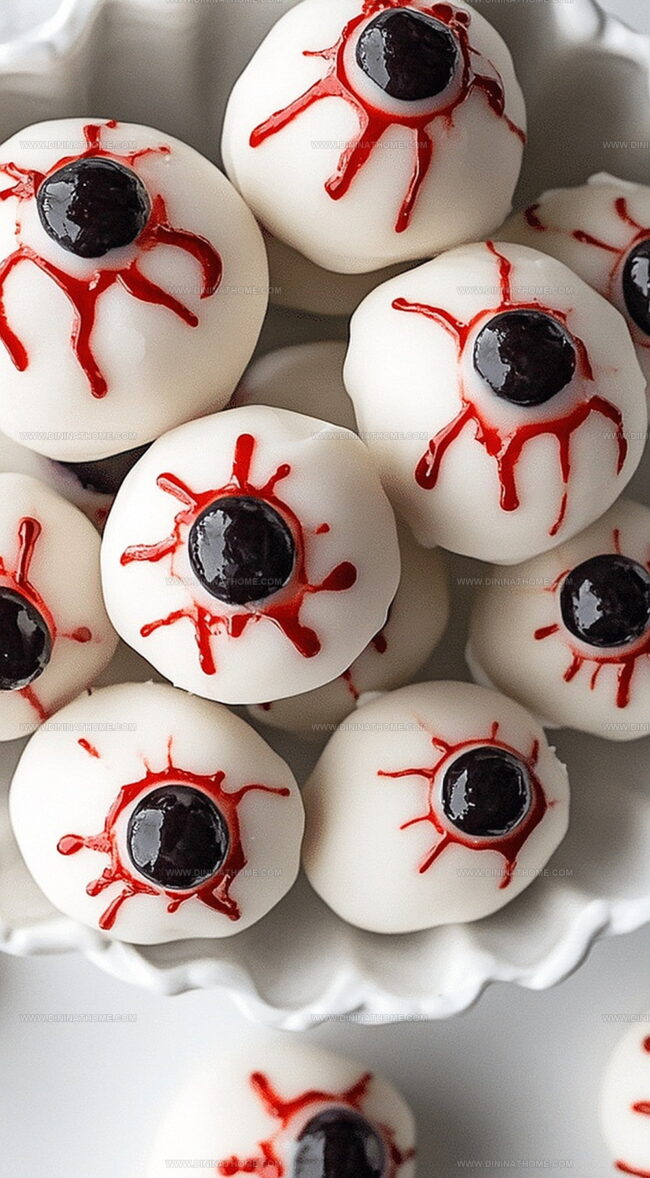
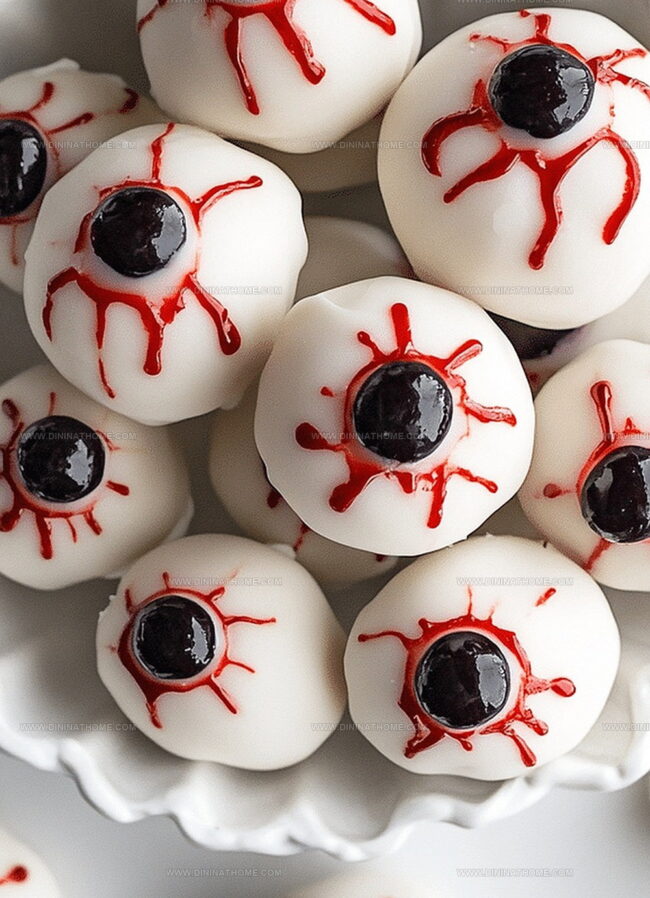
Each eyeball looks like a ghoulish masterpiece that will make guests gasp and giggle.
Marshmallow and white chocolate form the perfect base for these creepy confections.
Red food coloring creates dramatic veins that snake across the glossy surface.
Decorative details like pupil placement turn ordinary sweets into spine-chilling snacks.
You’ll totally rock this recipe and become the Halloween party hero with these wickedly awesome treats.
Halloween Bloodshot Eyeballs Candy Is Creepy And Fun
Halloween Candy Eyeballs Recipe Details
Chocolate Base:Decorative Elements:Finishing Touches:Halloween Eyeball Candy Recipe Steps
Step 1: Prepare Chocolate Base
Gently melt white chocolate using a double boiler or microwave.
Once smooth and liquid, carefully pour small circular dollops onto a parchment-lined baking sheet.
Use the back of a spoon to create uniform round shapes that will serve as the base for your creepy eyeballs.
Step 2: Insert Candy Centers
Place a decorative candy eyeball directly in the center of each white chocolate circle.
Press gently to ensure the candy eye stays secure and sinks slightly into the soft chocolate surface.
Step 3: Create Bloodshot Effect
Using red icing or liquid food coloring, carefully draw thin, jagged lines radiating outward from the candy eye center.
These lines will mimic the appearance of bloodshot veins, adding a gruesome and realistic touch to your Halloween treat.
Step 4: Add Detailed Accents
Optional but recommended: Use blue icing or gel to outline the edges of the candy eye, creating depth and additional creepy dimension.
This extra layer of detail will make your eyeball candies look more intricate and Halloween-ready.
Step 5: Chill and Serve
Place the decorated eyeball candies in the refrigerator for about 15-20 minutes to allow the chocolate and decorations to set completely.
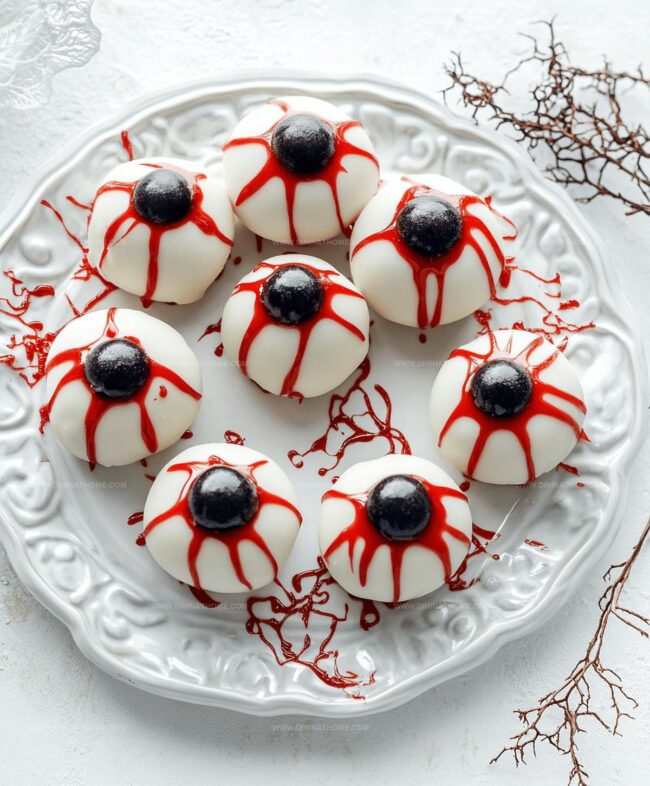
Once firm, transfer to a serving platter and watch guests react with delighted horror to your spooky Halloween creation.
Halloween Eyeballs Candy – Tips For Easy Shaping
Bloodshot Eyeballs Candy: Keep Them Fresh
Halloween Eyeballs Candy Fun Pairings
Halloween Eyeball Candies Fun Variants
FAQs
Use the back of a spoon or a round cookie cutter to help shape the melted white chocolate evenly on parchment paper. Gently tap the surface to remove air bubbles and create a smooth, circular base.
Yes, these Halloween eyeball candies can be prepared up to 3 days in advance. Store them in an airtight container in the refrigerator to maintain their shape and freshness.
Edible sugar eyes or round candy buttons work perfectly. If you can’t find pre-made candy eyes, you can create them using royal icing or melted colored chocolate.
Use a toothpick or thin paintbrush to draw the red veins carefully. Start from the center and create thin, branching lines to mimic the look of bloodshot eyes. Work slowly and vary the line thickness for a more natural effect.
Print
Halloween Bloodshot Eyeballs Candy Recipe
- Total Time: 20 minutes
- Yield: 12 1x
Description
Spine-chilling halloween bloodshot eyeballs candy deliver gruesome delight with creamy white chocolate and realistic red veining. Guests will shriek with playful horror when spotting these eerily realistic sweet treats nestled on party platters.
Ingredients
Main Ingredients:
- 1 block white chocolate
- 1 pack candy eyeballs
Secondary Ingredients:
- 1–2 drops red food coloring
- 1–2 drops blue food coloring
Optional Garnish:
- 1 tablespoon (15 milliliters) piping gel
Instructions
- Carefully melt the white chocolate using a double boiler or microwave, stirring until smooth and glossy.
- Pour the melted chocolate into small circular molds, creating uniform round bases for the eyeball candies.
- Gently press a candy eyeball into the center of each white chocolate round, ensuring it sits securely.
- Using red icing or food coloring, delicately draw intricate, web-like veins across the white chocolate surface to mimic bloodshot eye appearance.
- Optional: Enhance the eerie effect by outlining the candy eyeball with blue icing or gel, creating depth and additional creepy details.
- Allow the Halloween treats to set completely at room temperature or refrigerate to speed up the hardening process.
- Once firm, carefully remove the eyeball candies from the molds and arrange on a serving platter for a spine-chilling dessert presentation.
Notes
- Experiment with different chocolate types like dark or milk chocolate for varied flavors and visual effects.
- Use a piping bag or small spoon to create precise, uniform round chocolate bases for consistent eyeball shapes.
- Customize the “bloodshot” effect by varying the intensity and pattern of red icing veins for a more dramatic or subtle Halloween look.
- Ensure chocolate is completely cooled and hardened before adding detailed icing to prevent smearing and maintain crisp design lines.
- Prep Time: 15 minutes
- Cook Time: 5 minutes
- Category: Desserts, Snacks
- Method: Blending
- Cuisine: American
Nutrition
- Serving Size: 12
- Calories: 120
- Sugar: 15g
- Sodium: 10mg
- Fat: 6g
- Saturated Fat: 3.5g
- Unsaturated Fat: 2g
- Trans Fat: 0g
- Carbohydrates: 16g
- Fiber: 0g
- Protein: 1g
- Cholesterol: 5mg
James Walker
Lead Recipe Developer & Culinary Educator
Expertise
Southern Cuisine & Farm-to-Table Cooking, Recipe Development & Testing, Culinary Education & Instruction
Education
School: Auguste Escoffier School of Culinary Arts
Program: Diploma in Culinary Arts and Operations
Focus: Comprehensive training in classical and modern culinary techniques, kitchen operations, and farm-to-table practices.
James didn’t learn cooking from a TV show, he learned it from busy kitchens, family gatherings, and long afternoons spent testing recipes the hard way.
After training at the Auguste Escoffier School of Culinary Arts, he brought his love for real, down-to-earth food to every dish he makes.
At Dining At Home, James loves building recipes that feel familiar but still have something special, like adding a twist to a classic or making a slow Sunday dinner feel brand new.
When he’s not in the kitchen, you’ll probably find him swapping garden tips at the farmers’ market or teaching his daughter how to flip pancakes without a mess (almost).