
Pillowy Soft Cloud Brioche Recipe to Bake at Home
Baking this cloud brioche transforms ordinary mornings into extraordinary culinary adventures.
Soft, pillowy textures emerge from a delicate dance of ingredients.
Gentle kneading creates a magical canvas of buttery goodness.
Home kitchens become bakery sanctuaries with each careful fold.
Whispers of warmth and comfort drift through the air as golden layers take shape.
Delicate crumbs promise a sensory journey that melts right on you.
Let’s unlock the secrets of this irresistible bread that beckons with pure deliciousness.
Cloud Brioche That’s Light, Fluffy, And Beautifully Baked
Quick Kitchen Magic: Unlock Brioche Brilliance
What You’ll Use in Fluffy Cloud Brioche
Flour Base:Dairy and Liquid Components:Flavor Enhancers:Leavening Agent:Fat Component:Egg Wash:Brioche Baking Instructions for a Fluffy Cloud Finish
Step 1: Mixing the Magical Base
In a stand mixer bowl, combine flour, sugar, salt, and yeast.
Pour in eggs and lukewarm milk.
Mix slowly until a rough, shaggy dough starts to form.
The mixture will look uneven and clumpy, but don’t worry – this is totally normal.
Step 2: Butter Transformation
Begin adding softened butter cubes gradually.
Let each cube blend completely before introducing the next.
Knead the dough on medium speed for 8-10 minutes.
Watch the magic happen as the dough becomes smooth, stretchy, and slightly tacky to touch.
Step 3: First Dough Rise
Move the dough into a greased bowl.
Cover with plastic wrap and place in a cozy, warm location.
Allow the dough to expand and rise for 1-2 hours until it doubles in volume.
Step 4: Shaping Your Bread
Gently deflate the risen dough and transfer to a flour-dusted surface.
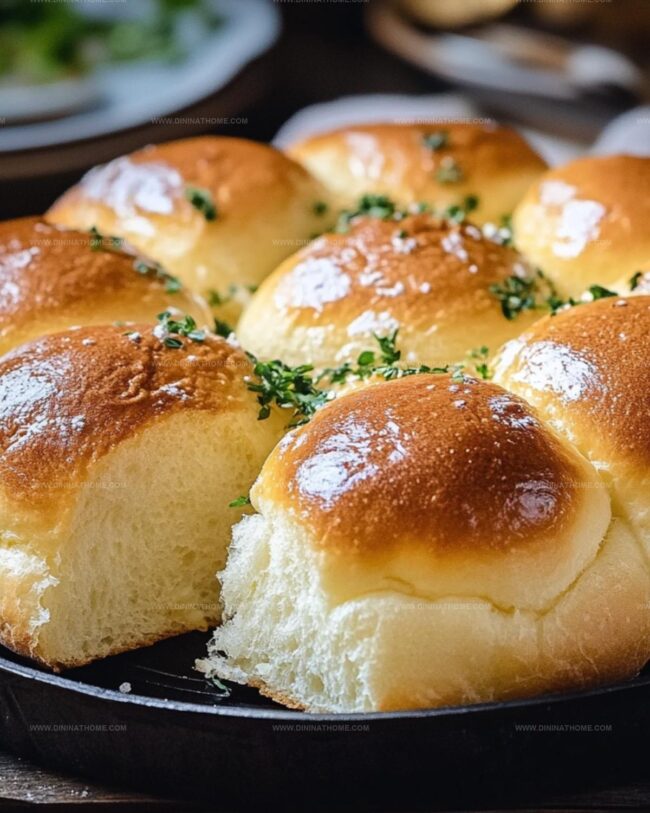
Shape into a beautiful loaf or create adorable rolls.
Place the shaped dough into a greased loaf pan or on a lined baking sheet.
Step 5: Second Rise
Drape a clean kitchen towel over the shaped dough.
Let it rise again for 45-60 minutes.
The dough should look puffy and feel soft when gently pressed.
Step 6: Creating the Golden Glaze
Whisk an egg with milk in a small bowl.
Carefully brush this mixture over the surface of the brioche, ensuring even coverage.
Step 7: Baking to Perfection
Preheat the oven to 350°F.
Bake the loaf for 25-30 minutes or rolls for 15-20 minutes.
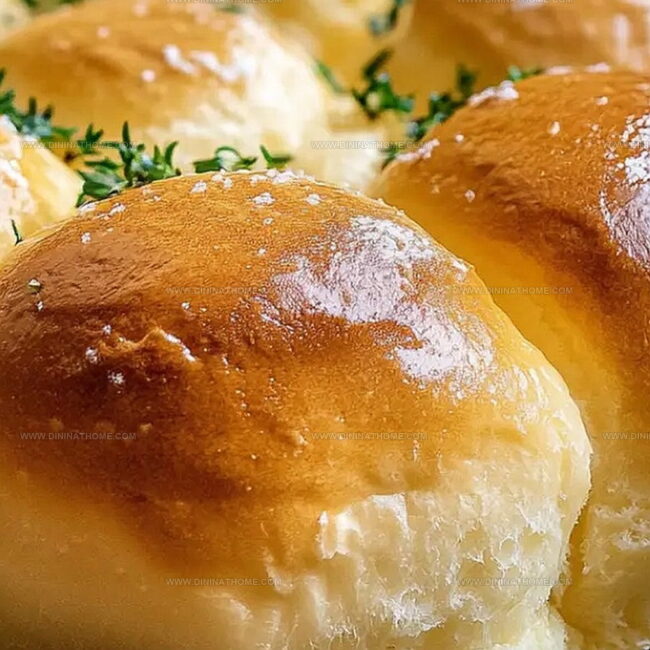
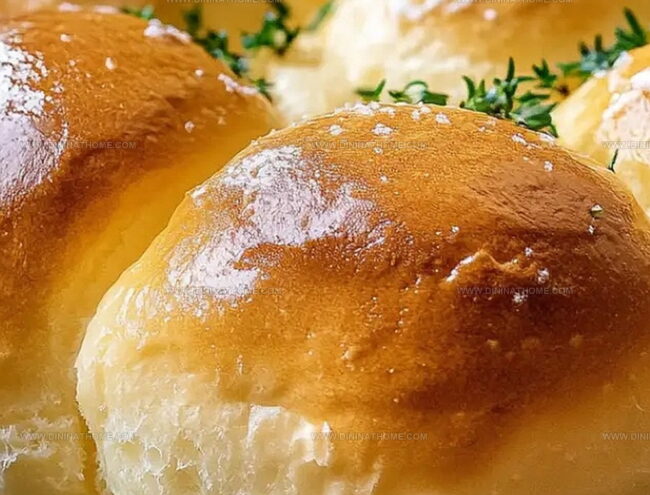
Look for a gorgeous golden-brown color and listen for a hollow sound when tapping the bottom of the bread.
Step 8: Cooling and Serving
Transfer the brioche to a wire rack.
Allow it to cool completely before slicing.
Enjoy your homemade bread with butter, jam, or simply on its own.
Brioche Dough Tips for Fluffy Cloud-Like Loaves
Store Fluffy Cloud Brioche for Later
What to Serve with Fluffy Cloud Brioche
Fluffy Cloud Brioche Baking Twists
FAQs
Brioche dough contains a high butter and egg content, which creates a rich, tender, and soft texture compared to traditional bread doughs. This extra fat makes brioche more luxurious and slightly sweet.
Extended kneading develops gluten and helps incorporate butter evenly, creating a smooth, elastic dough that results in the signature fluffy and light brioche texture. The long kneading process also helps create structure and strength in the dough.
The dough should become smooth, elastic, and slightly sticky after kneading. When you stretch a small piece, it should form a thin, translucent “windowpane” without tearing, indicating that gluten has been fully developed.
While possible, a stand mixer makes the process easier. Kneading by hand requires significant arm strength and patience to achieve the same smooth, elastic consistency. If kneading manually, expect to spend 15-20 minutes working the dough thoroughly.
Print
Fluffy Cloud Brioche Recipe
- Total Time: 45 minutes
- Yield: 12 1x
Description
Heavenly cloud brioche transports taste buds to French bakery bliss with its pillowy texture and golden exterior. Delicate layers melt effortlessly, inviting you to savor each buttery, light-as-air bite of pure culinary comfort.
Ingredients
Main Ingredients:
- 4 cups (500g) bread flour
- 4 large eggs (room temperature)
- 3/4 cup (170g) unsalted butter (softened, cut into cubes)
Sweeteners and Seasonings:
- 1/4 cup (50g) granulated sugar
- 1 teaspoon salt
Leavening and Liquid Ingredients:
- 1 tablespoon instant yeast
- 1/4 cup (60ml) whole milk (lukewarm)
Egg Wash:
- 1 egg
- 1 tablespoon milk
Instructions
- Craft a pillowy base by blending flour, sugar, salt, and yeast in a stand mixer’s bowl, integrating eggs and lukewarm milk until a rough texture emerges.
- Methodically introduce softened butter, one cube at a time, allowing complete absorption between additions. Knead the mixture until a silky, slightly tacky consistency develops, approximately 8-10 minutes.
- Relocate the dough to a generously greased container, envelop with plastic wrap, and nestle in a warm environment for 1-2 hours, observing the volume double.
- Deflate the dough with a gentle punch, transfer to a flour-dusted surface, and mold into a loaf or individual rolls. Position in a greased pan or on a parchment-lined baking sheet.
- Drape a pristine kitchen towel over the shaped dough, permitting a secondary rise for 45-60 minutes until the surface appears puffy and responsive to gentle touch.
- Whisk egg and milk together, creating a glossy wash to enhance the brioche’s exterior appearance and golden sheen.
- Heat the oven to 350°F (175°C). Gently brush the egg mixture across the dough’s surface, then bake until a rich amber color emerges and tapping the bottom produces a hollow resonance—approximately 25-30 minutes for a loaf, 15-20 minutes for rolls.
- Transfer the freshly baked brioche to a wire rack, allowing complete cooling before slicing or serving to preserve its delicate texture.
Notes
- Always use room temperature ingredients to ensure smooth and consistent dough mixing, preventing lumpy textures.
- Knead the dough thoroughly to develop gluten, creating that signature light and airy brioche texture with a tender crumb.
- Avoid overproofing by watching the dough’s rise; it should double in size but not collapse, which can lead to dense bread.
- For dairy-free alternatives, substitute milk with almond or oat milk and use coconut oil instead of butter, maintaining the rich flavor profile.
- Prep Time: 15 minutes
- Cook Time: 30 minutes
- Category: Breakfast, Snacks, Desserts
- Method: Baking
- Cuisine: French
Nutrition
- Serving Size: 12
- Calories: 330
- Sugar: 8 g
- Sodium: 150 mg
- Fat: 20 g
- Saturated Fat: 12 g
- Unsaturated Fat: 6 g
- Trans Fat: 0 g
- Carbohydrates: 30 g
- Fiber: 1 g
- Protein: 7 g
- Cholesterol: 90 mg
James Walker
Lead Recipe Developer & Culinary Educator
Expertise
Southern Cuisine & Farm-to-Table Cooking, Recipe Development & Testing, Culinary Education & Instruction
Education
School: Auguste Escoffier School of Culinary Arts
Program: Diploma in Culinary Arts and Operations
Focus: Comprehensive training in classical and modern culinary techniques, kitchen operations, and farm-to-table practices.
James didn’t learn cooking from a TV show, he learned it from busy kitchens, family gatherings, and long afternoons spent testing recipes the hard way.
After training at the Auguste Escoffier School of Culinary Arts, he brought his love for real, down-to-earth food to every dish he makes.
At Dining At Home, James loves building recipes that feel familiar but still have something special, like adding a twist to a classic or making a slow Sunday dinner feel brand new.
When he’s not in the kitchen, you’ll probably find him swapping garden tips at the farmers’ market or teaching his daughter how to flip pancakes without a mess (almost).