
The Spookiest Easy Halloween Fudge Recipe That Kids Adore
Sweet chocolate lovers might stumble upon this easy halloween fudge that transforms ordinary dessert into a spooky delight.
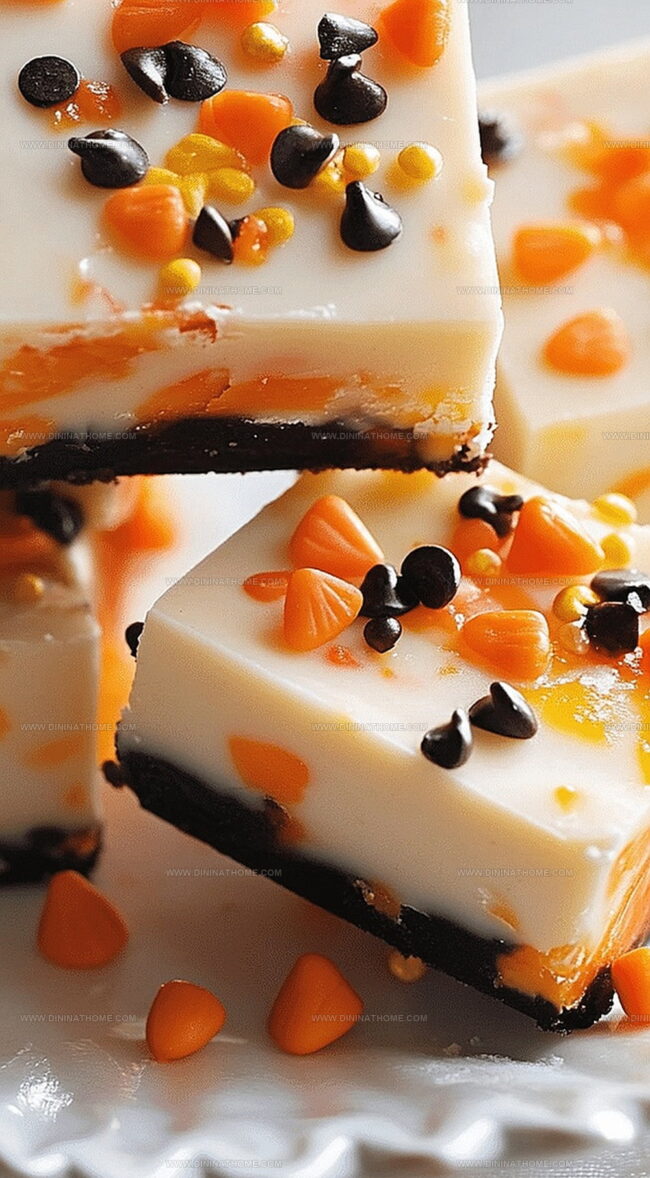
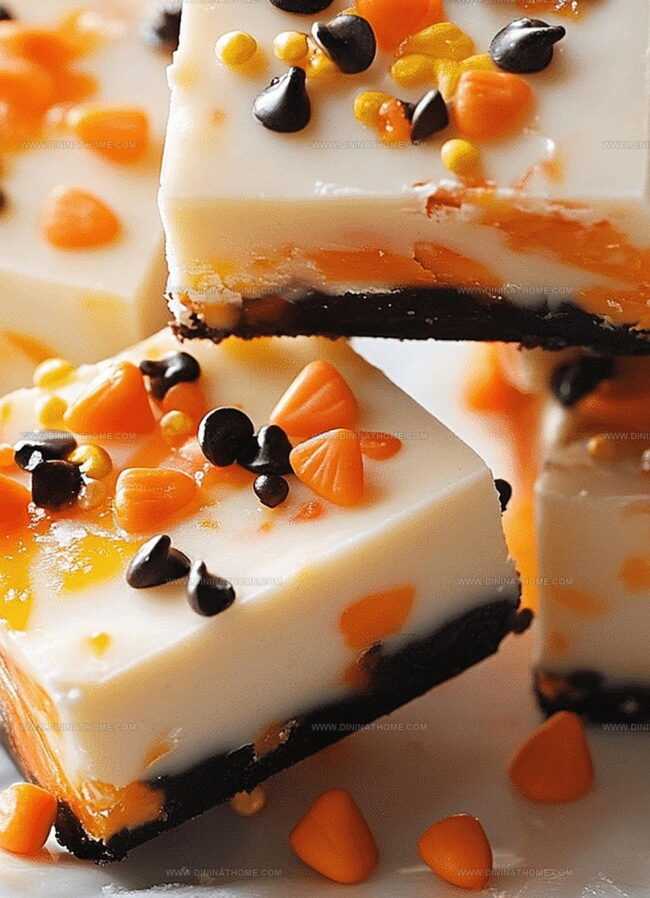
Ghoulish decorations create playful patterns across smooth, creamy surfaces.
Dark chocolate mixed with marshmallow cream produces incredible textures you can’t resist.
Festive sprinkles and candy corn add whimsical touches that spark excitement.
Kids adore helping craft these delectable squares with minimal kitchen skills.
Seasonal treats become magical memories when shared around the table.
Prepare to enchant everyone with this wickedly delicious confection that promises pure Halloween happiness.
Easy Halloween Fudge Brings The Sweet Fun
Easy Halloween Fudge Ingredient Guide
Halloween Base Ingredients:Decorative Topping Ingredients:How To Prepare Easy Halloween Fudge

Step 1: Prepare Baking Surface
Line an 8×8 inch baking dish with parchment paper, ensuring the paper covers the bottom and sides completely for easy removal later.
Step 2: Create Chocolate Base
In a medium saucepan, combine:Heat over medium flame, stirring constantly until the mixture becomes silky smooth and fully incorporated.
Step 3: Spread Chocolate Layer
Pour the glossy chocolate mixture into the prepared baking dish, using a spatula to spread it evenly across the surface, creating a perfect flat layer.
Step 4: Add White Chocolate Accent
Melt white chocolate chips in a separate pan or microwave, then artfully drizzle the melted white chocolate across the dark chocolate base in creative swirls or zigzag patterns.
Step 5: Decorate with Festive Touches
Sprinkle Halloween-themed decorations generously over the fudge, such as:Step 6: Chill and Slice
Refrigerate the fudge for at least 2 hours until completely set and firm.
Remove from the refrigerator and cut into bite-sized squares using a sharp knife, creating perfect Halloween treat portions.
Halloween Fudge – Easy Tips For Clean Slicing
The Right Way to Store and Reheat Halloween Fudge
Halloween Fudge Treat Matches
Easy Halloween Fudge Fun Flavor Combos
FAQs
No, it’s super simple! With just a few basic ingredients and easy steps, anyone can create this festive Halloween treat in no time.
Absolutely! You can mix and match chocolate chips like milk chocolate, dark chocolate, or even colored candy melts to create your own unique fudge design.
Always line your baking dish with parchment paper, which creates a non-stick surface and makes removing and cutting the fudge much easier.
Use orange, black, or Halloween-colored sprinkles, and consider adding candy corn, mini chocolate chips, or Halloween-shaped candy decorations on top to boost the festive look.
Print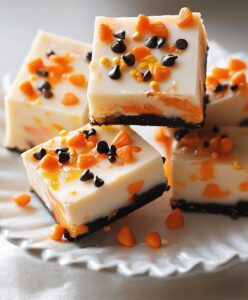
Easy Halloween Fudge Recipe
- Total Time: 15 minutes
- Yield: 12 1x
Description
Spooky “Halloween Fudge” brings festive cheer with its ghoulish design and creamy chocolate base. Colorful sprinkles and candy corn create a playful dessert you’ll love to share during Halloween celebrations.
Ingredients
Main Ingredients:
- 1 can (14 ounces / 396 grams) sweetened condensed milk
- 2 cups (340 grams) semi-sweet chocolate chips
- 1 cup (170 grams) white chocolate chips
Decorative Ingredients:
- 1/2 cup Halloween-themed sprinkles or candies
Instructions
- Prepare an 8×8 inch baking pan by lining it completely with parchment paper, ensuring full coverage of the bottom and sides for easy removal.
- Combine semi-sweet chocolate chips and sweetened condensed milk in a medium saucepan, melting them together over gentle heat while continuously stirring until the mixture transforms into a glossy, uniform consistency.
- Transfer the molten chocolate mixture into the prepared pan, using a spatula to distribute it evenly and create a smooth surface.
- In a separate heating vessel, gently melt white chocolate chips until they become completely liquid and silky.
- Create decorative drizzles of white chocolate across the dark chocolate base, using a spoon or piping bag for precision.
- Immediately scatter Halloween-themed sprinkles and candy pieces over the surface, pressing them lightly to ensure they adhere to the fudge.
- Carefully place the pan in the refrigerator and allow the fudge to set and solidify for approximately 2 hours or until completely firm.
- Once chilled, lift the fudge out of the pan using the parchment paper edges and slice into neat, uniform squares using a sharp knife.
Notes
- Use high-quality chocolate chips for a richer, more luxurious fudge texture that melts smoothly and creates a professional finish.
- Create a gluten-free version by ensuring all chocolate chips and sprinkles are certified gluten-free, making this treat accessible for those with dietary restrictions.
- Experiment with different Halloween-themed decorations like candy corn, orange and black sprinkles, or spooky-shaped candy toppers to enhance the festive seasonal appeal.
- Store the fudge in an airtight container in the refrigerator for up to one week, allowing the flavors to meld and maintain a perfect firm yet creamy consistency.
- Prep Time: 10 minutes
- Cook Time: 5 minutes
- Category: Desserts, Snacks
- Method: Baking
- Cuisine: American
Nutrition
- Serving Size: 12
- Calories: 150
- Sugar: 15g
- Sodium: 30mg
- Fat: 7g
- Saturated Fat: 4g
- Unsaturated Fat: 2g
- Trans Fat: 0g
- Carbohydrates: 20g
- Fiber: 1g
- Protein: 2g
- Cholesterol: 5mg
James Walker
Lead Recipe Developer & Culinary Educator
Expertise
Southern Cuisine & Farm-to-Table Cooking, Recipe Development & Testing, Culinary Education & Instruction
Education
School: Auguste Escoffier School of Culinary Arts
Program: Diploma in Culinary Arts and Operations
Focus: Comprehensive training in classical and modern culinary techniques, kitchen operations, and farm-to-table practices.
James didn’t learn cooking from a TV show, he learned it from busy kitchens, family gatherings, and long afternoons spent testing recipes the hard way.
After training at the Auguste Escoffier School of Culinary Arts, he brought his love for real, down-to-earth food to every dish he makes.
At Dining At Home, James loves building recipes that feel familiar but still have something special, like adding a twist to a classic or making a slow Sunday dinner feel brand new.
When he’s not in the kitchen, you’ll probably find him swapping garden tips at the farmers’ market or teaching his daughter how to flip pancakes without a mess (almost).