
Classic Patty Melt Recipe: Sizzling Goodness Between Bread
Comfort food takes on a whole new dimension with this classic patty melt nestled between perfectly toasted bread.
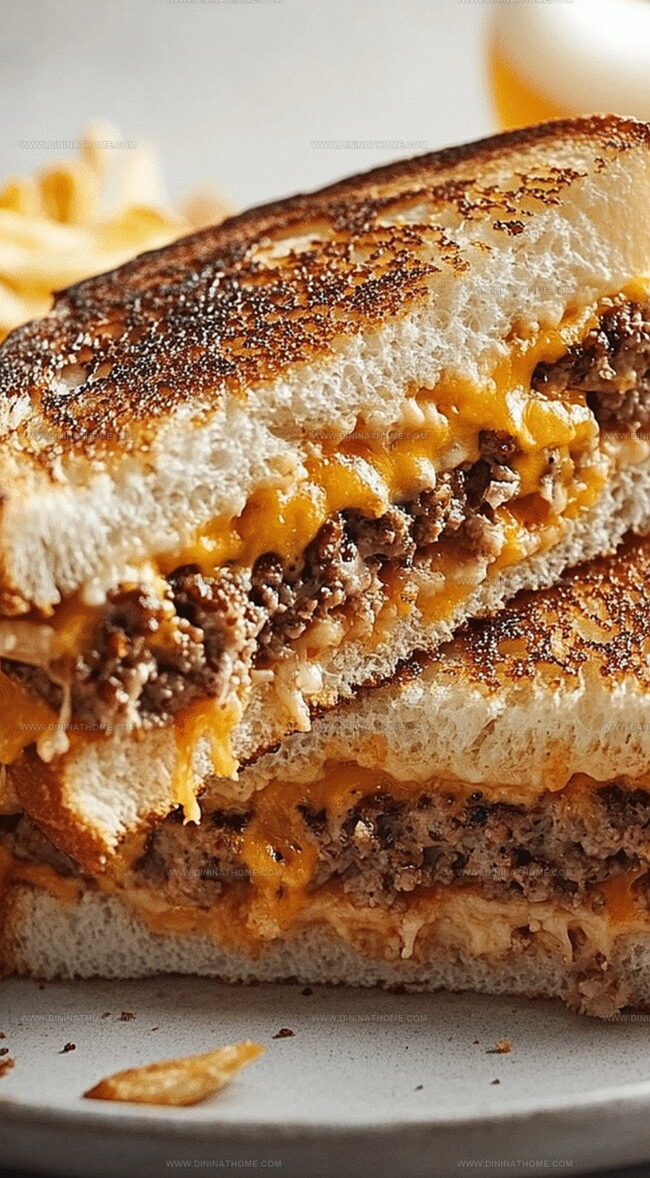
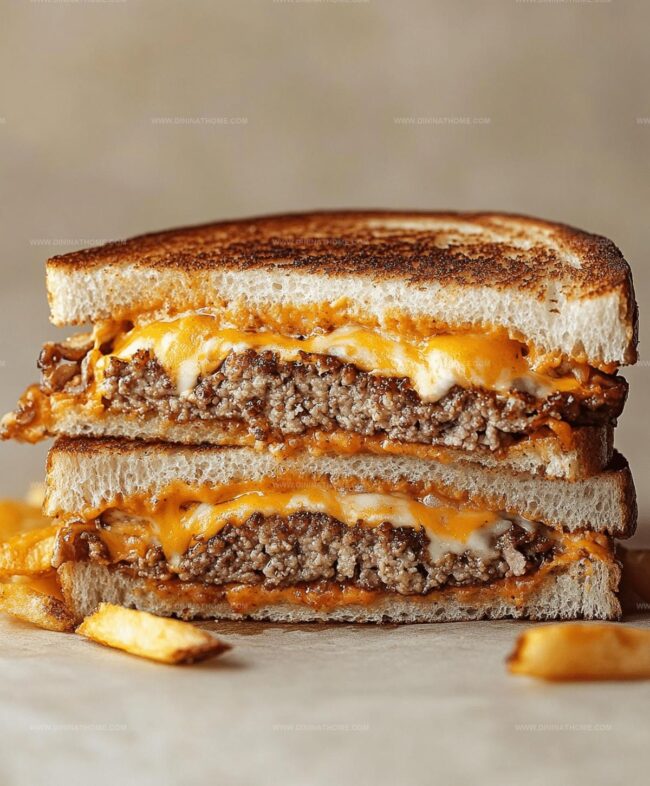
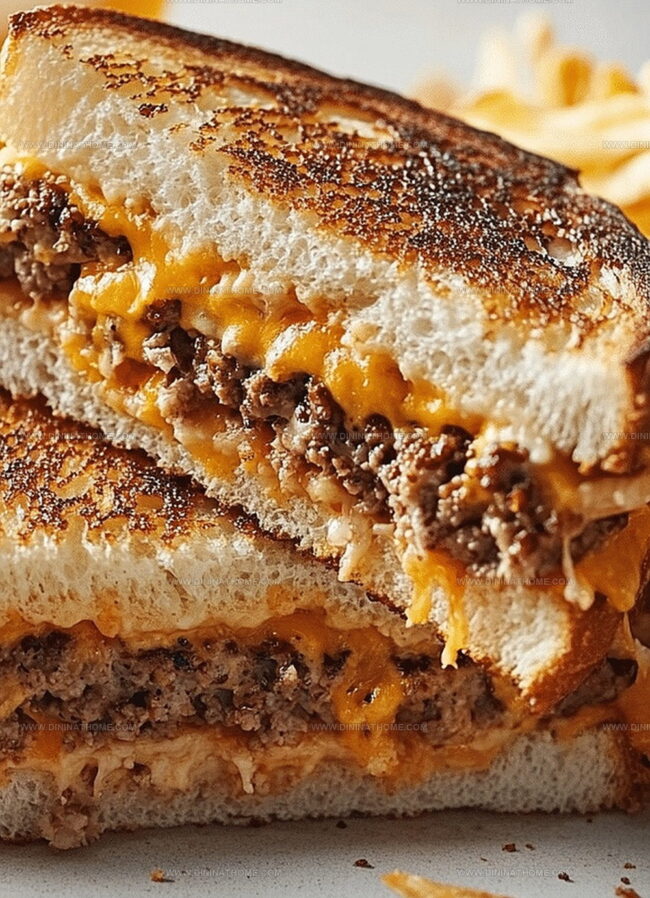
Buttery slices cradle a juicy beef patty with melted cheese that oozes deliciousness.
Diner-style magic happens when caramelized onions add deep, rich flavor to every bite.
Crispy edges and soft centers create a perfect textural symphony in each mouthwatering slice.
Nostalgic memories of roadside diners come flooding back with this timeless sandwich.
Salt and pepper become your flavor allies in crafting this irresistible meal.
Grab a skillet and let’s transform simple ingredients into a culinary masterpiece you won’t be able to resist.
Classic Patty Melt Gives Nostalgic Diner Vibes
Classic Patty Melt Ingredient Breakdown
Meat and Cheese:Bread and Butter:Seasonings and Aromatics:Classic Patty Melt Prep Directions
Step 1: Caramelize Onions
Grab a skillet and set it over medium heat.
Drop in butter and let it melt smoothly.
Add sliced onions and cook them slowly, stirring occasionally, until they turn deep golden brown and become wonderfully sweet and soft, which takes about 10-12 minutes.
Step 2: Craft Beef Patties
Shape ground beef into 4 compact patties.
Sprinkle with salt and pepper for robust flavor.
Cook the patties in a separate pan, giving each side 3-4 minutes to develop a beautiful brown crust and reach your preferred level of doneness.
Step 3: Melt Cheese
Place a slice of cheese on top of each hot beef patty, allowing it to drape and melt luxuriously over the meat.
Step 4: Prepare Bread
Take rye bread slices and butter one side of each piece generously, ensuring complete coverage for maximum golden crispiness.
Step 5: Build Sandwich
Layer each patty with caramelized onions between two slices of buttered rye bread, positioning the buttered sides outward for perfect toasting.
Step 6: Toast to Perfection
Return the assembled sandwiches to the skillet over medium heat.
Cook for 2-3 minutes on each side, watching for a gorgeous golden-brown crust that’s crispy and inviting.
Step 7: Serve Immediately
Slice the patty melts diagonally and serve piping hot, ready to be devoured.
Patty Melt – Tips For Toasting And Melting Cheese
Reheating and Storage Tips for Classic Patty Melt
Patty Melt Side Picks
Classic Patty Melt Fresh Toppings to Try
FAQs
Ground chuck with 80/20 fat content provides the most flavor and juiciness, ensuring a tender and rich-tasting patty.
Swiss or provolone are excellent alternatives to American cheese, offering slightly different flavor profiles while maintaining the classic melt texture.
Avoid overcooking by using a meat thermometer and removing patties when they reach 160°F internal temperature, and don’t press down on the meat while cooking to retain moisture.
Traditional patty melts use rye bread, but sourdough or Texas toast can work well if you prefer a different bread type or don’t have rye available.
Print
Classic Patty Melt Recipe
- Total Time: 30 minutes
- Yield: 4 1x
Description
Sizzling classic patty melt promises a delightful journey through comfort food paradise. Melted cheese, caramelized onions, and perfectly grilled beef nestled between buttery toasted rye bread will make you crave another bite.
Ingredients
Main Protein:
- 1 pound (1 lb) ground beef
Cheese and Dairy:
- 4 slices Swiss cheese
- 2 tablespoons (2 tbsp) butter
Vegetables and Seasonings:
- 1 large onion, thinly sliced
- Salt, to taste
- Pepper, to taste
Bread:
- 8 slices rye bread
Instructions
- Caramelize onions in a skillet with melted butter, stirring occasionally until they develop a rich, golden-brown color and soft, sweet texture, approximately 10-12 minutes.
- Craft ground beef patties with gentle handling, seasoning generously with salt and pepper, then sear in a separate pan for 3-4 minutes per side to achieve desired doneness.
- Immediately crown each sizzling patty with a slice of cheese, allowing it to melt luxuriously over the warm meat.
- Prepare rye bread slices by spreading a thin, even layer of butter on one side of each piece, ensuring complete coverage.
- Construct the sandwich by layering a cheese-topped patty and a generous portion of caramelized onions between two buttered rye bread slices, positioning the buttered surfaces outward.
- Transfer the assembled sandwich to a heated skillet, grilling each side for 2-3 minutes until the bread transforms into a crisp, golden-brown exterior with a satisfying crunch.
- Slice the patty melt diagonally, creating two triangular halves, and serve immediately while still piping hot and perfectly melted.
Notes
- Master caramelizing onions by stirring frequently and using medium-low heat to prevent burning and develop rich, sweet flavor.
- Use high-fat ground beef like 80/20 chuck for juicier, more flavorful patties that won’t dry out during cooking.
- Ensure even toasting by pressing down gently with a spatula while grilling the sandwich, creating a crispy golden-brown exterior.
- Experiment with cheese variations like sharp cheddar or Swiss for different flavor profiles that complement the beef and caramelized onions.
- Prep Time: 10 minutes
- Cook Time: 20 minutes
- Category: Lunch, Dinner, Snacks
- Method: Sautéing
- Cuisine: American
Nutrition
- Serving Size: 4
- Calories: 650
- Sugar: 2 g
- Sodium: 900 mg
- Fat: 38 g
- Saturated Fat: 18 g
- Unsaturated Fat: 20 g
- Trans Fat: 1 g
- Carbohydrates: 45 g
- Fiber: 3 g
- Protein: 34 g
- Cholesterol: 90 mg
James Walker
Lead Recipe Developer & Culinary Educator
Expertise
Southern Cuisine & Farm-to-Table Cooking, Recipe Development & Testing, Culinary Education & Instruction
Education
School: Auguste Escoffier School of Culinary Arts
Program: Diploma in Culinary Arts and Operations
Focus: Comprehensive training in classical and modern culinary techniques, kitchen operations, and farm-to-table practices.
James didn’t learn cooking from a TV show, he learned it from busy kitchens, family gatherings, and long afternoons spent testing recipes the hard way.
After training at the Auguste Escoffier School of Culinary Arts, he brought his love for real, down-to-earth food to every dish he makes.
At Dining At Home, James loves building recipes that feel familiar but still have something special, like adding a twist to a classic or making a slow Sunday dinner feel brand new.
When he’s not in the kitchen, you’ll probably find him swapping garden tips at the farmers’ market or teaching his daughter how to flip pancakes without a mess (almost).