
The Best Chocolate Crunchie Cheesecake Recipe For Sweet Lovers
A delightful chocolate crunchie cheesecake brings pure indulgence to your dessert table with minimal effort.
Sweet layers promise an unforgettable experience for anyone who loves decadent treats.
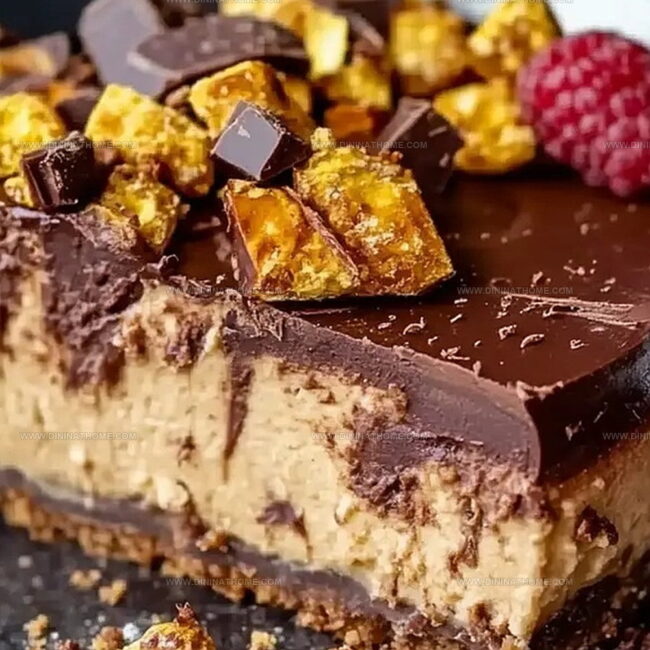
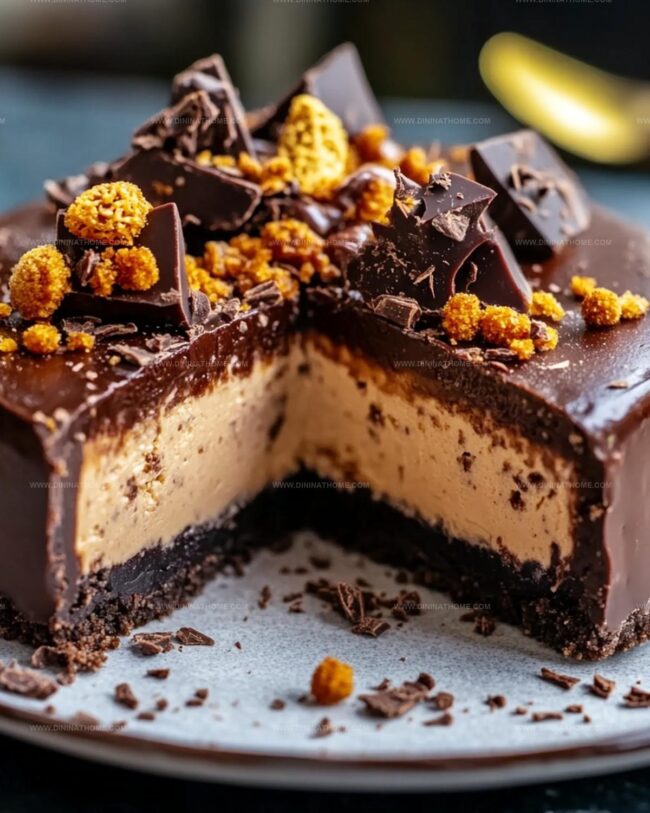
Crisp honeycomb pieces create unexpected texture against smooth cream cheese surfaces.
Crunchy chocolate elements add delicious complexity to each magnificent bite.
Rich ingredients blend seamlessly, creating a dessert that feels both luxurious and comforting.
Stunning visual appeal matches incredible flavor profiles in this simple yet spectacular creation.
Prepare to wow everyone with a dessert that sparks immediate conversation and joy.
Crunchy Chocolate Cheesecake With Creamy Layers
Chocolate Crunchie Cheesecake What’s Inside
Base Ingredients:Filling Ingredients:Topping Ingredients:Layered Chocolate Crunchie Cheesecake Baking Guide
Step 1: Create The Crumbly Foundation
Grab a 20cm loose-bottom cake tin and line its base with parchment paper.
Crush chocolate digestive biscuits into fine crumbs and blend thoroughly with melted butter.
Press this delectable mixture firmly into the tin’s bottom, creating a smooth, compact layer.
Refrigerate for 20 minutes to solidify the base.
Step 2: Whip Up Creamy Filling
Using an electric mixer, blend cream cheese, powdered sugar, and vanilla essence until smooth.
Slowly incorporate double cream while mixing gently.
Continue whisking until the mixture transforms into a thick, luxurious consistency.
Carefully fold in crushed Crunchie bars, distributing them evenly throughout the creamy mixture.
Step 3: Layer And Chill
Gently spoon the luscious filling over the chilled biscuit base, spreading it smoothly and evenly.
Transfer the cheesecake to the refrigerator and let it rest overnight, allowing flavors to meld and texture to set perfectly.
Step 4: Create Chocolate Drizzle Topping
Remove cheesecake from tin by running a small knife around its edges.
Melt dark chocolate and cream together in the microwave, stirring until silky smooth.
Allow the chocolate mixture to cool to room temperature until spreadable.
Pour and spread the glossy chocolate over the cheesecake’s surface.
Sprinkle additional chopped Crunchie bars on top for extra crunch and visual appeal.
Step 5: Serve And Indulge
Return the cheesecake to the refrigerator for one final hour to set the topping completely.
Slice into elegant portions and savor each decadent bite of this irresistible dessert.
Cheesecake Crunch Bar Tips for a Perfect Chocolate Snap

Chill Chocolate Crunchie Cheesecake
What Goes with Chocolate Crunchie Cheesecake
Chocolate Crunch Cheesecake Alternatives
FAQs
Yes, you can substitute Crunchie bars with other honeycomb or toffee-based chocolate bars like Dime or Butterfinger for a similar crunchy texture.
You’ll need a 20cm loose-bottom cake tin, a hand mixer or stand mixer, and basic kitchen tools like a blender or food processor to crush the biscuits.
No, this cheesecake contains dairy products like cream cheese, double cream, and butter, making it not suitable for vegetarians.
The cheesecake can be stored in the refrigerator for up to 4-5 days when kept in an airtight container or wrapped securely in plastic wrap.
Print
Chocolate Crunchie Cheesecake Recipe
- Total Time: 25 minutes
- Yield: 8 1x
Description
Indulgent chocolate crunchie cheesecake beckons with layers of rich chocolate and honeycomb crunch. Sweet dreams come alive through creamy textures and irresistible flavors that sweep you into pure dessert bliss.
Ingredients
Main Ingredients:
- 700 grams (24.7 ounces) full-fat cream cheese
- 320 grams (11.3 ounces) chocolate digestive biscuits
- 300 milliliters (10.1 fluid ounces) double cream
- 200 grams (7.1 ounces) dark chocolate
Baking Components:
- 110 grams (3.9 ounces) butter, melted
- 100 grams (3.5 ounces) icing sugar
Flavor Enhancers:
- 4 Crunchie Bars, crushed and chopped
- 100 milliliters (3.4 fluid ounces) cream
- 1 dash vanilla essence
Instructions
- Craft a sturdy foundation by lining a 20cm loose-bottom cake tin with parchment paper, ensuring complete coverage of the base.
- Transform chocolate digestive biscuits into a crumbly mixture by blitzing them and combining with melted butter, then firmly press the mixture into the tin’s base.
- Refrigerate the base for 20 minutes to create a solid, compact foundation.
- Utilize a hand mixer to blend cream cheese, icing sugar, and vanilla essence until smooth and integrated.
- Introduce double cream gradually while mixing at a gentle pace, whisking until the mixture achieves a luxurious, thick consistency without overmixing.
- Gently fold crushed Crunchie bars into the creamy mixture, distributing them evenly throughout.
- Carefully transfer the cheesecake filling onto the chilled biscuit base, spreading it uniformly to create a level surface.
- Allow the cheesecake to rest in the refrigerator overnight, enabling the filling to set and develop its rich texture.
- Carefully release the cheesecake from the tin by running a small knife around its edge.
- Create a glossy chocolate topping by melting dark chocolate and cream together in the microwave, allowing it to cool to a spreadable consistency.
- Generously drizzle and spread the chocolate topping across the cheesecake’s surface.
- Garnish with additional chopped Crunchie bars, sprinkling them artfully over the chocolate layer.
- Return the cheesecake to the refrigerator for an additional hour to ensure the topping sets perfectly.
- Slice with a sharp knife and serve chilled, revealing the decadent layers of chocolate, honeycomb, and creamy filling.
Notes
- Chill the base thoroughly to ensure a crisp, sturdy foundation that won’t crumble when serving.
- Avoid overmixing the cream cheese filling to prevent a runny texture, stopping when the mixture becomes thick and smooth.
- Crush Crunchie bars roughly to maintain delightful honeycomb chunks throughout the cheesecake for varied texture.
- Let chocolate topping cool slightly before spreading to achieve a glossy, even layer that sets beautifully without running off the edges.
- Prep Time: 25 minutes
- Cook Time: 0 minutes
- Category: Desserts
- Method: Chilling
- Cuisine: American
Nutrition
- Serving Size: 8
- Calories: 570
- Sugar: 32g
- Sodium: 250mg
- Fat: 38g
- Saturated Fat: 22g
- Unsaturated Fat: 12g
- Trans Fat: 1g
- Carbohydrates: 42g
- Fiber: 2g
- Protein: 6g
- Cholesterol: 95mg
James Walker
Lead Recipe Developer & Culinary Educator
Expertise
Southern Cuisine & Farm-to-Table Cooking, Recipe Development & Testing, Culinary Education & Instruction
Education
School: Auguste Escoffier School of Culinary Arts
Program: Diploma in Culinary Arts and Operations
Focus: Comprehensive training in classical and modern culinary techniques, kitchen operations, and farm-to-table practices.
James didn’t learn cooking from a TV show, he learned it from busy kitchens, family gatherings, and long afternoons spent testing recipes the hard way.
After training at the Auguste Escoffier School of Culinary Arts, he brought his love for real, down-to-earth food to every dish he makes.
At Dining At Home, James loves building recipes that feel familiar but still have something special, like adding a twist to a classic or making a slow Sunday dinner feel brand new.
When he’s not in the kitchen, you’ll probably find him swapping garden tips at the farmers’ market or teaching his daughter how to flip pancakes without a mess (almost).