
Scrumptious Cherry Cheese Danish Recipe for Sweet Mornings
Crafting a delectable cherry cheese danish requires precision and passion for baking.
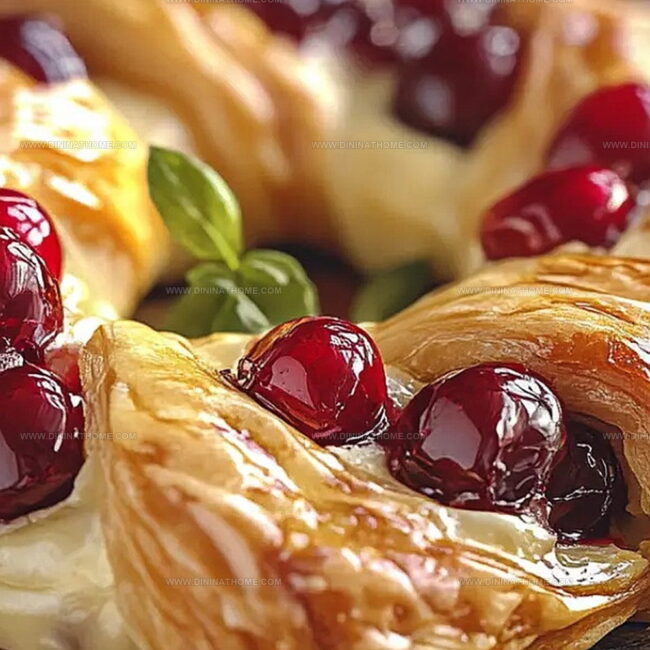
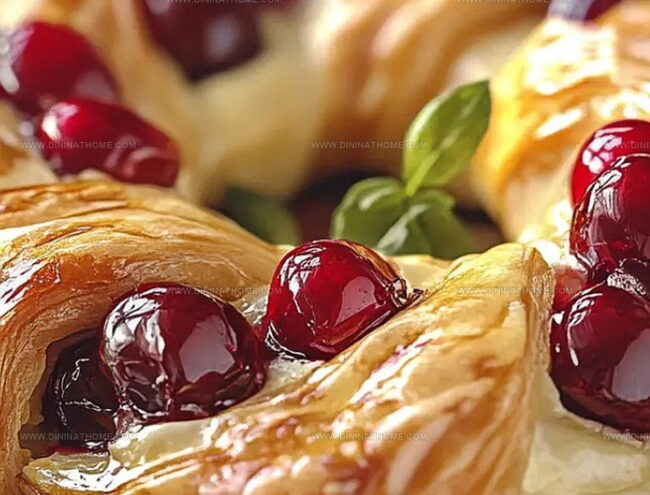
Sweet cherries nestled between layers of buttery pastry create a mesmerizing treat.
Cream cheese provides rich, velvety smoothness that complements the fruity filling.
Delicate flaky edges hint at the culinary magic waiting inside each bite.
Bakers love how simple ingredients transform into an elegant breakfast pastry.
Simple steps lead you toward a mouthwatering masterpiece that impresses everyone at the table.
Fall in love with this irresistible danish that promises pure morning delight.
Why Cherry Cheese Danish Impresses
Cherry Cheese Danish: What’s Inside
Pastry Base:Cheese Filling:Fruit and Finishing:Cherry Cheese Danish Baking in Simple Steps
Step 1: Whip Creamy Cheese Mixture
Grab a medium bowl and blend softened cream cheese with sugar using an electric mixer until silky smooth.
Add egg yolk, ricotta cheese, almond extract, salt, and lemon zest.
Mix everything thoroughly until well combined.
Cover and refrigerate the mixture while preparing other components.
Step 2: Prepare Pastry Canvas
Warm up the oven to 350°F and line two baking sheets with parchment paper.
Sprinkle flour on your work surface.
Gently roll out puff pastry sheets to smooth edges.
Slice each sheet into 9 equal squares, creating 18 total pastry squares.
Step 3: Shape and Fill Danish Treats
Position pastry squares on prepared baking sheets with even spacing.
Use a spoon or fingertips to press a gentle center indentation on each square.
Dollop cheese mixture into the center of each square.
Crown the cheese filling with a generous spoonful of cherry pie filling.
Step 4: Create Golden Glaze
Delicately brush pastry edges with egg wash to achieve a beautiful golden finish.
Step 5: Bake to Perfection
Slide baking sheets into the preheated oven.
Bake for 20-25 minutes until pastries puff up and turn a gorgeous golden brown.
Transfer danishes to a wire rack and allow them to cool slightly before serving.
Cherry Cheese Danish: Flaky Success Suggestions
Store Cherry Cheese Danish Leftovers
Snacks That Fit with Cherry Cheese Danish
Cherry Danish Dessert Style Spins
FAQs
Yes, you can easily swap cherry pie filling with other fruit preserves like blueberry, raspberry, or apricot to create varied flavor profiles.
Ricotta adds richness and texture, but you can substitute it with mascarpone or additional cream cheese if needed. The key is maintaining a creamy consistency.
Ensure your cream cheese mixture isn’t too wet and avoid overloading the pastry squares with filling. Always use cold puff pastry and work quickly to maintain its flakiness.
Prepare the cheese filling and pastry squares in advance, but assemble and bake just before serving to keep the pastry crisp and fresh.
Print
Cherry Cheese Danish Recipe
- Total Time: 40 minutes
- Yield: 8 1x
Description
Delightful Danish pastry “cherry cheese danish” marries sweet cherries with rich cream cheese in a buttery, flaky embrace. Crisp golden layers and tangy fruit create a perfect breakfast or dessert that beckons you to savor each delectable bite.
Ingredients
Cheese Filling:
- 4 ounces (113 grams) cream cheese, softened
- 1/4 cup sugar
- 1 egg yolk
- 1 tablespoon ricotta cheese
- 1/2 teaspoon almond extract (or vanilla extract)
- Pinch of salt
- 1/2 tablespoon lemon zest
Pastry and Topping:
- 2 sheets puff pastry (1 box), thawed
- Flour (for dusting)
- 1 can cherry pie filling
Egg Wash:
- 1 large egg, beaten with 1 tablespoon of water
Instructions
- Craft the creamy cheese mixture by whipping softened cream cheese with sugar until velvety smooth. Incorporate egg yolk, ricotta, almond extract, salt, and lemon zest, ensuring a uniform consistency. Chill the filling in the refrigerator to set the flavors.
- Heat the oven to 350°F and prepare baking sheets with parchment paper. Dust a work surface with flour and gently roll out puff pastry sheets to smooth their edges. Slice each sheet into nine precise squares, creating a total of 18 delicate pastry bases.
- Arrange the pastry squares on prepared baking sheets, maintaining even spacing. Delicately press the center of each square to form a shallow well for filling. Spoon the chilled cheese mixture into the center of each square, creating a creamy foundation.
- Crown each cheese-filled square with a generous dollop of cherry pie filling, allowing the vibrant fruit to peek through the creamy base. Tenderly brush the pastry edges with egg wash, ensuring a lustrous golden finish.
- Slide the danishes into the preheated oven and bake for 20-25 minutes. Watch for the pastry to transform into a puffy, golden-brown masterpiece. Once baked, transfer to a wire rack and allow to cool slightly, letting the flavors meld and settle.
Notes
- Softening cream cheese is crucial for a smooth, lump-free filling. Let it sit at room temperature for about 30 minutes before mixing.
- Experiment with different fruit fillings like blueberry, raspberry, or apricot preserves for variety and personal taste.
- For a lighter version, swap full-fat cream cheese with reduced-fat alternatives and use a low-sugar pie filling to cut calories.
- Ensure puff pastry is cold when handling to maintain its flaky texture and prevent sticking during preparation.
- Prep Time: 15 minutes
- Cook Time: 25 minutes
- Category: Breakfast, Snacks, Desserts
- Method: Baking
- Cuisine: Danish
Nutrition
- Serving Size: 8
- Calories: 250
- Sugar: 10 g
- Sodium: 180 mg
- Fat: 15 g
- Saturated Fat: 8 g
- Unsaturated Fat: 5 g
- Trans Fat: 0 g
- Carbohydrates: 25 g
- Fiber: 1 g
- Protein: 4 g
- Cholesterol: 50 mg
James Walker
Lead Recipe Developer & Culinary Educator
Expertise
Southern Cuisine & Farm-to-Table Cooking, Recipe Development & Testing, Culinary Education & Instruction
Education
School: Auguste Escoffier School of Culinary Arts
Program: Diploma in Culinary Arts and Operations
Focus: Comprehensive training in classical and modern culinary techniques, kitchen operations, and farm-to-table practices.
James didn’t learn cooking from a TV show, he learned it from busy kitchens, family gatherings, and long afternoons spent testing recipes the hard way.
After training at the Auguste Escoffier School of Culinary Arts, he brought his love for real, down-to-earth food to every dish he makes.
At Dining At Home, James loves building recipes that feel familiar but still have something special, like adding a twist to a classic or making a slow Sunday dinner feel brand new.
When he’s not in the kitchen, you’ll probably find him swapping garden tips at the farmers’ market or teaching his daughter how to flip pancakes without a mess (almost).